Tuesday, January 31, 2017

Home Sweet Home

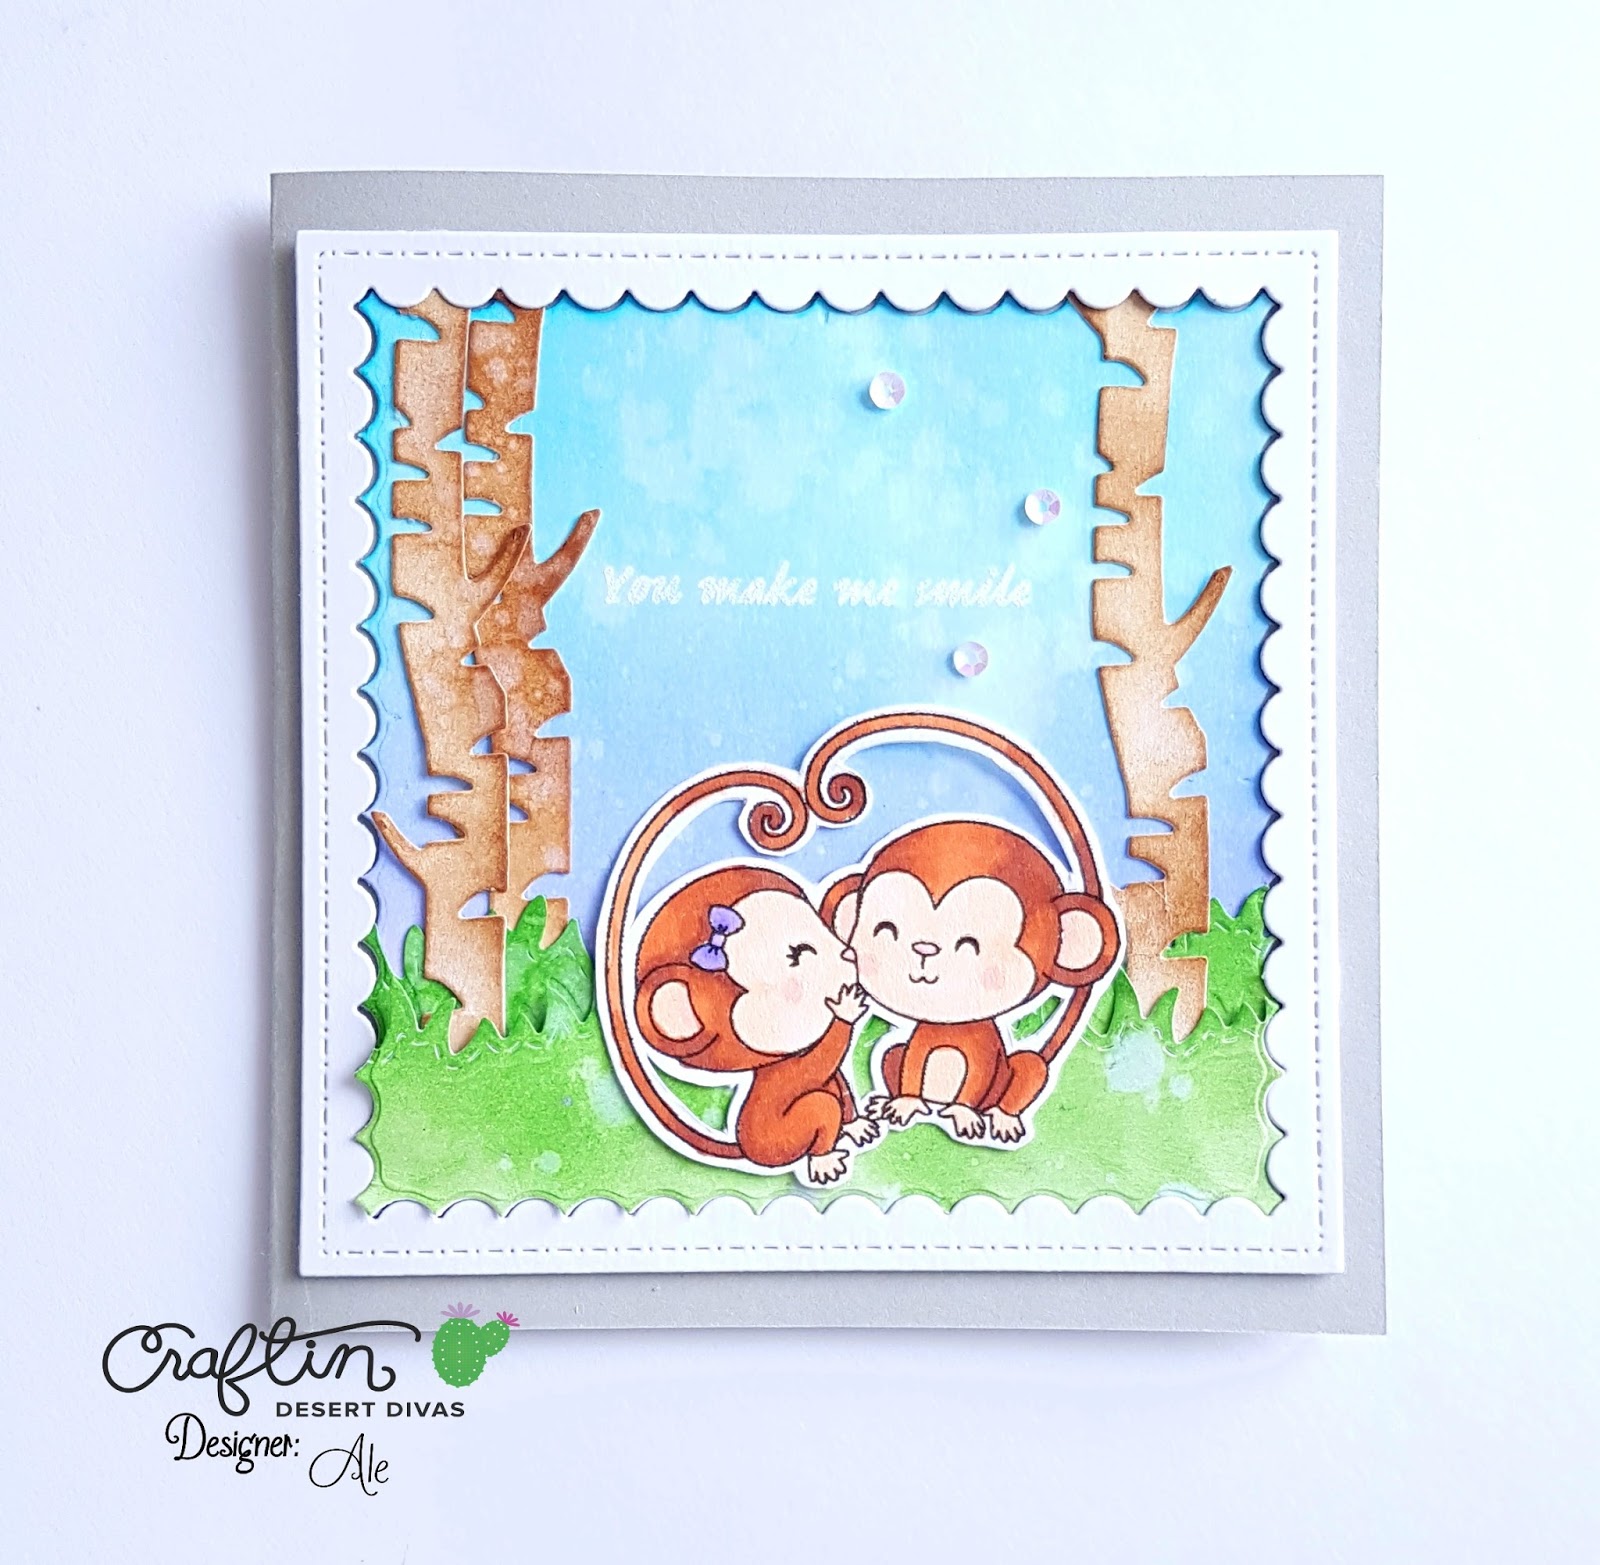
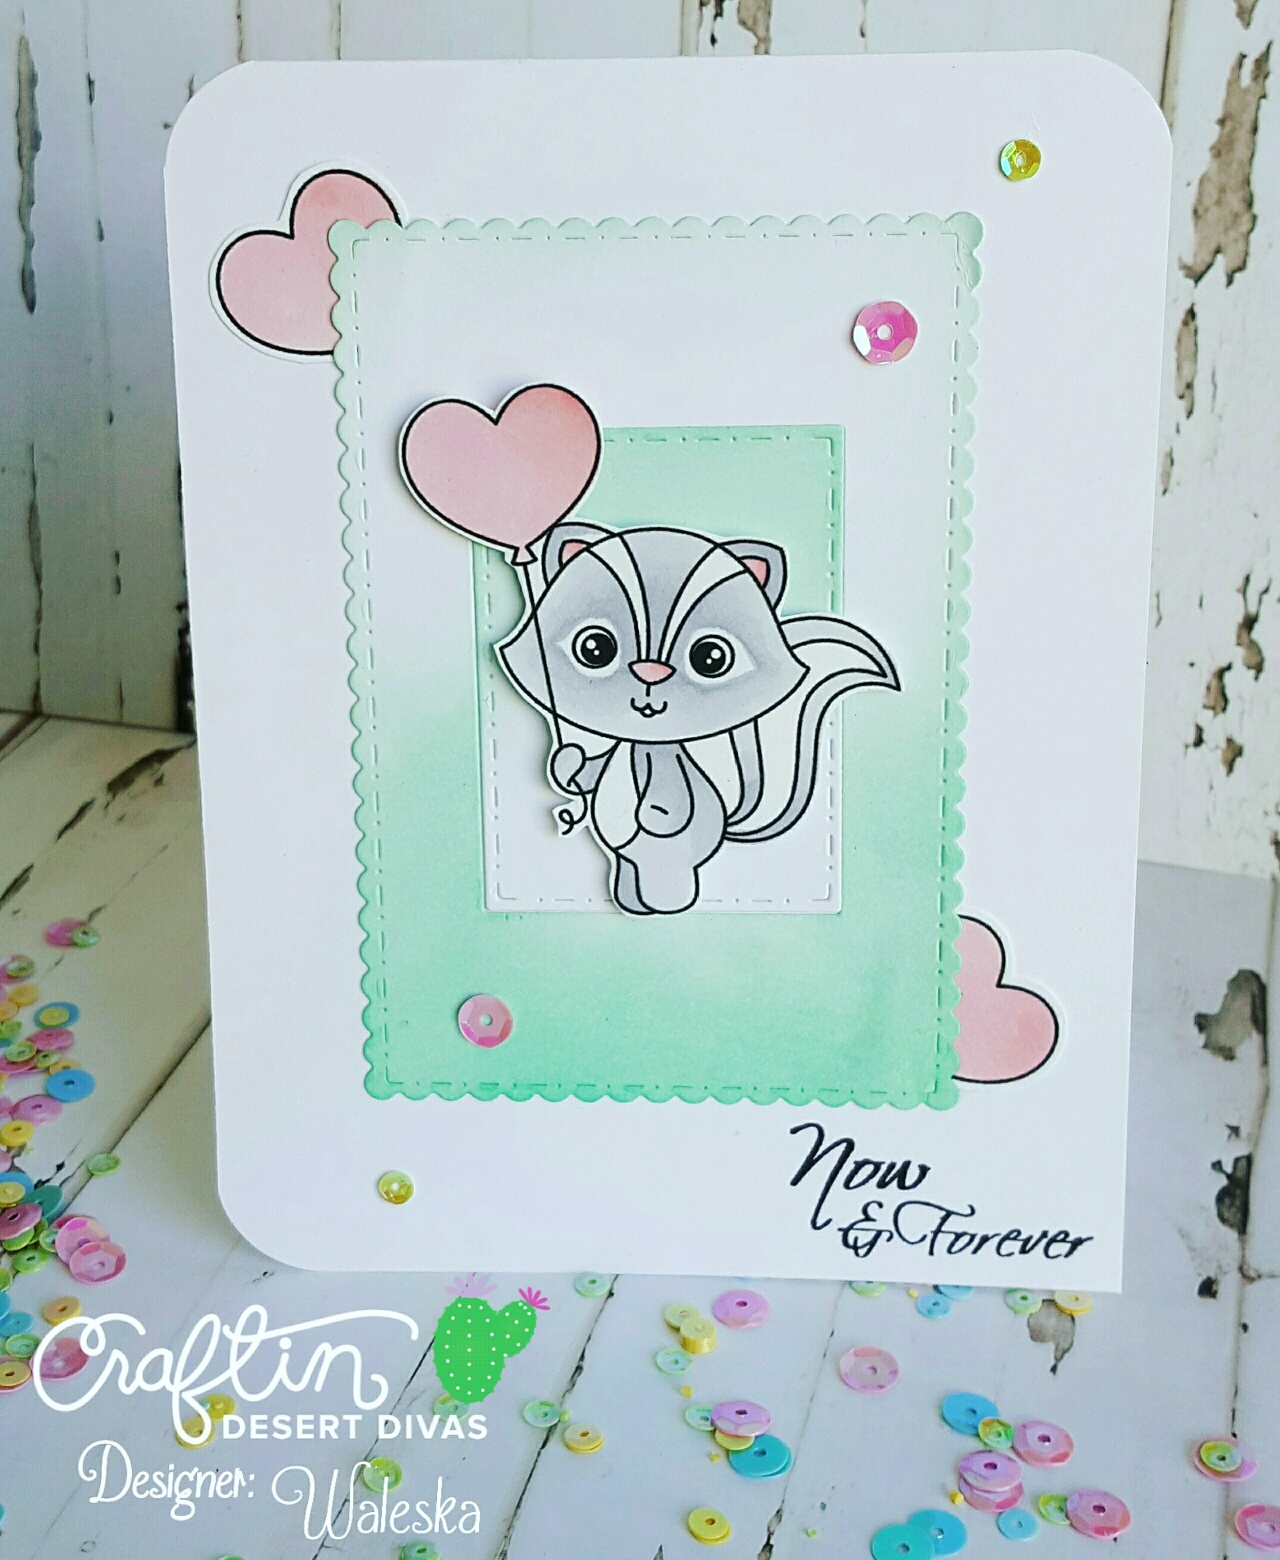
Hello Lovelies, today I am going to share a cute & simple card I made for a little inspiration over at Craftin Desert Divas.
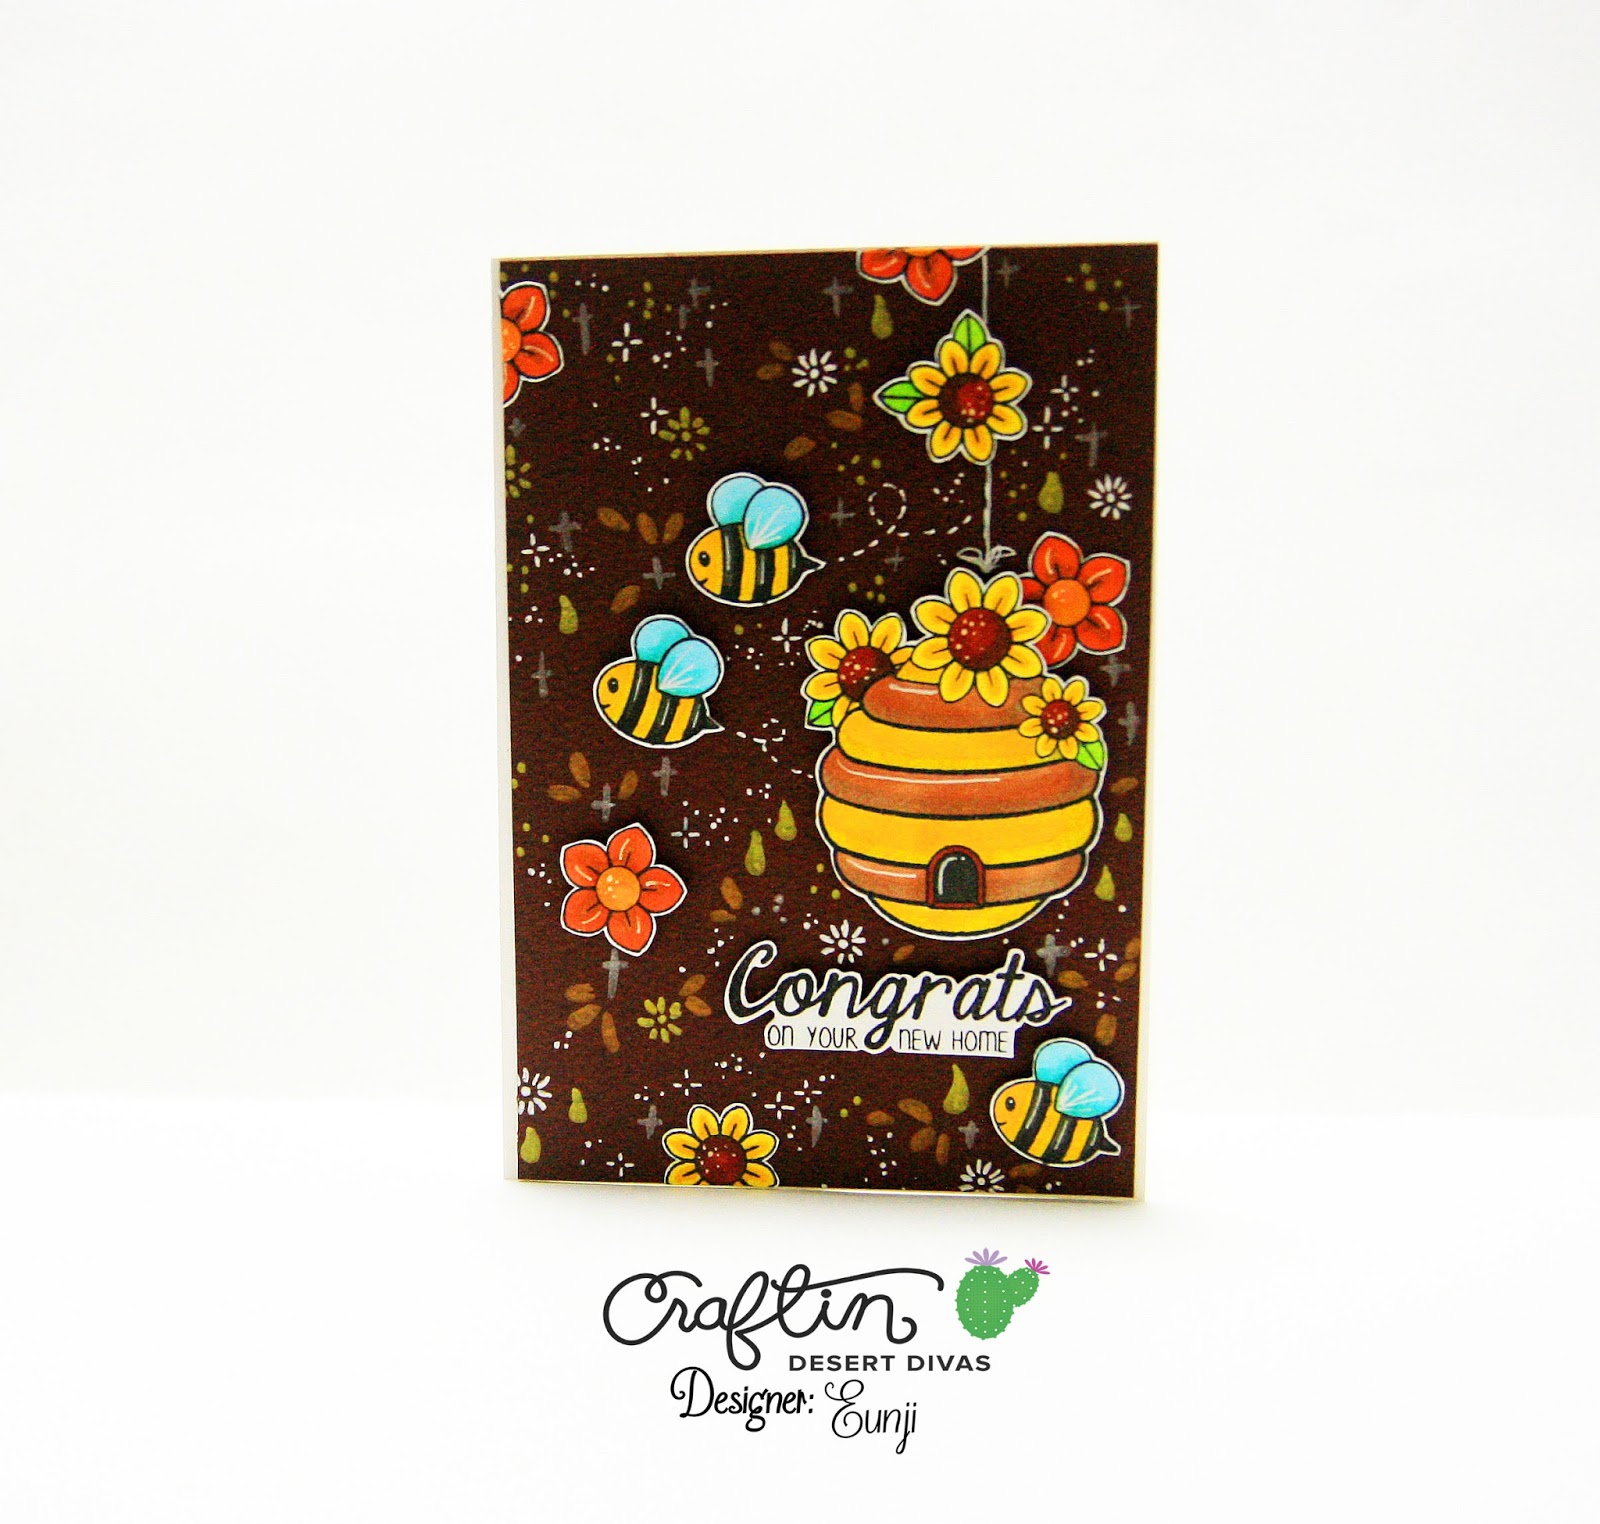
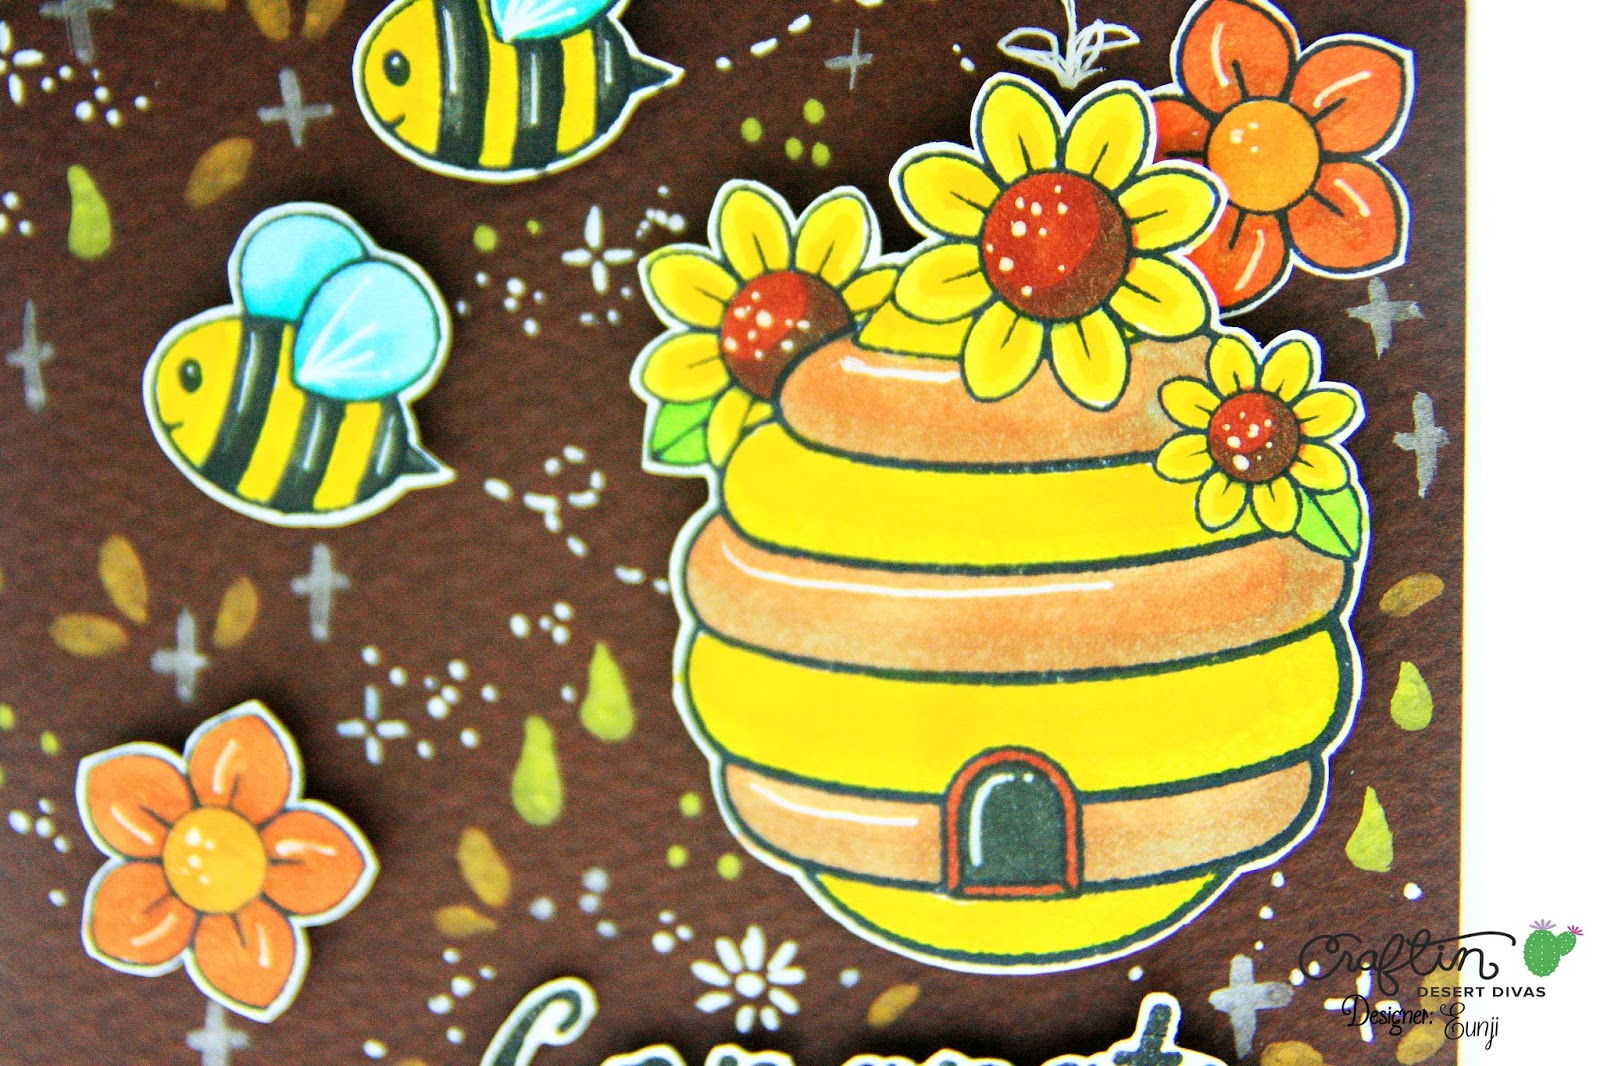
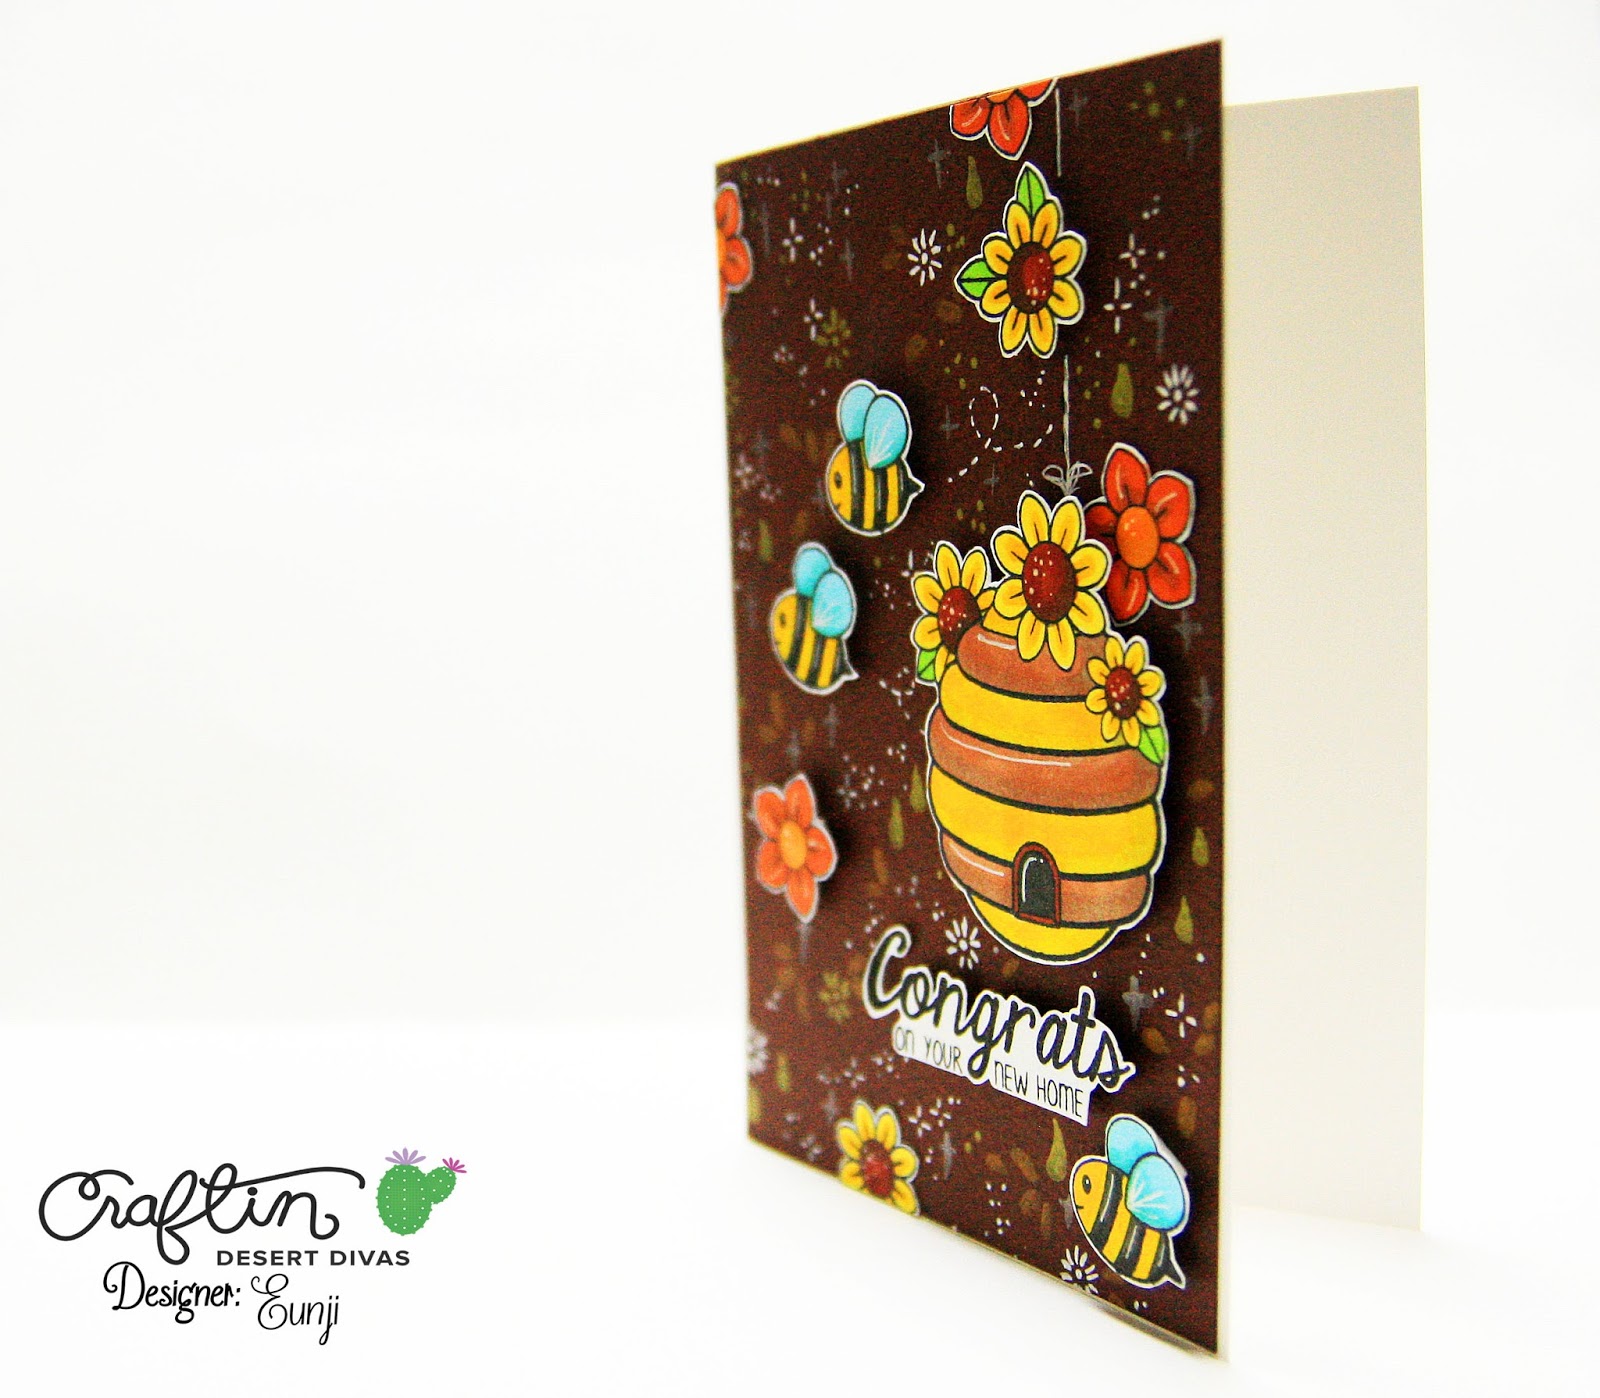
A little bee activity with a few visitors to see what's up. I am obsessed with the animal stamps at the moment, LOL.
The darling stamps I used are as follows. 
I hope you liked my card, hop on over the blog, join our page or stop by the for lots of inspiration for your next project! Don't forget we run a monthly challenge as well!


Monday, January 30, 2017

Mirror Stamping Video Tutorial

Hello Everyone! It's Lindsay from the DT, back again to share a fun and easy stamping technique with you! Today, I have a video tutorial on Mirror Stamping. There have been quite a few tutorials on this technique, and I tried them, but I had one problem. I could not pull my stamp straight up from the acetate. There would always be smearing or double lines (sometimes triple) and after about my 15th attempt I knew I needed to find another way, so I pulled out my stamp positioner. Watch the video tutorial below to see exactly how I used my stamp positioner and the Mirror Stamping Technique to create this super fun card!
ENJOY!!


Using the little pig from the CDD Farm Living Stamp Set, My MISTI (Any Stamp Positioner will work here), a large piece of watercolor paper and waterproof black dye ink I first stamped the pig exactly how it should appear. I made sure to stamp in the center of the paper so I could go back and die cut later without worrying about placement, which is also why I used such a large piece of watercolor paper. With my first pig stamped I cleaned off the stamp and removed the watercolor paper from my MISTI and inserted a piece of acetate. I placed the pig stamp onto my watercolor paper with the side that is intended to be mounted onto acrylic blocks down onto the paper and then flipped the paper over, lining up the corner in the MISTI, placed my pig onto the acetate and then picked up the stamp onto the lid of my MISTI. After inking up and stamping the stamp a few times onto the acetate I used my MISTI again, placing the watercolor paper into the corner of the MISTI and then flipped the acetate over onto the paper, ink side down and lining up the corners in my MISTI and gave it a good press to transfer the image onto the paper, giving me a mirror image.
This mirror image is going to be a pretty light stamping so you do need to outline it with a pen. I used my micron pen because it is waterproof and I knew I would be using watercolors to color in my image. Just make sure to use a pen that plays nicely with your coloring medium and take your time. Next, I die cut my two pigs with the largest stitched rectangle die in the Fancy Frames Die Set, making sure to center the images in the die. To color my little scene I used Distress Markers and the straight to paper watercolor technique, using a light touch to give a soft effect.
Before I put my card together I stamped the "Missing You Pig Time" sentiment in the stamp set directly below the scene. Again, I used my MISTI so I wouldn't mess up my panel after all the work put into it! Then, I adhered the water color panel onto a kraft scalloped rectangle die cut, again from the Fancy Frames Die set, using double sided adhesive. Finally, I adhered the stacked panels onto an A2 top folding white card base with double sided adhesive. You could always use some fun foam or foam tape to add some dimension, but I wanted to keep this particular card nice and flat for easy hiding in luggage!

This technique is a great one to use for any card with a cute critter, but I can see it being especially useful for upcoming Valentine's Day cards! I found using a stamp positioner was really helpful, but remember, you don't necessarily need one to make this technique work, just be sure you have a pretty steady hand! If you want to check out the CDD products I used today, they're all linked below! I'll see you all next time!!

Sunday, January 29, 2017

Sending Get Well Wishes


Hi, everyone! Lisa from The Relativity of Paper bringing you the CDD Daily post featuring and . I decided that I wanted to create a Get Well card and thought this was the perfect time to use these beautiful Orchids. 


I've been using my SVG Outlines a lot lately to build shaker cards, and I decided to run with that technique once again. I have to say I'm kind of loving the end result. This method is so easy, once your SVG Outlines merged into your designer software, size it accordingly. I change the size of my mat to 4.25in. X 5.5in., the same size as my card base. By doing this, you can determine exactly where you want your cutout. I usually center mine so that I can use a die-cut like the . You will be surprised how quickly this card comes together. 


Here are the products I used:


As always, thank you for joining us!
And don't forget you can find us at


Saturday, January 28, 2017

Wishing You A Million Happy

Hello, everyone. This is DT member Joan
Today I want to share with you the shaker card I made use  stamp set.

Here is the card:


I die cutting shaker card panel using I also using to make grass with green card stock.
I stamped Chicken and chicks colored in with copic markers.


I hope you liked this card. Have an amazing day!!

CDD products used:


Friday, January 27, 2017

Now & Forever


Hello Crafty Girls! Waleska here to share a card I created with the cute Skunk with a Heart Balloon digital stamp... This new digi stamps CDD have at their shop are perfect for this coming Valentine's season,  they are the simply the cutest and they are only $0.99!!!


For this card I wanted a very soft coloring, I used Distress Ink Cracked Pistachio with a very soft blending for the the background and the softest grey and pink markers I had for the Skunk and the balloons.  I used the following Craftin Desert Divas Products:

Skunk with a Heart Balloon Digital Stamp

http://craftindesertdivas.com/skunk-with-a-heart-balloon-digital-stamp/

Fancy Frame Dies
http://craftindesertdivas.com/fancy-frame-dies/

Simply Said Stamp Set
http://craftindesertdivas.com/simply-said/

Pastel Paradise Sequins
http://craftindesertdivas.com/pastel-paradise-sequins/

To finish my card I added some of the beautiful CDD Pastel Paradise Sequins and rounded the corners of my card.  I hope you liked this card and you can go check out at the CDD Shop 
http://craftindesertdivas.com/  the newest digital stamps for this Valentine's season,
because they are the cutest!!!

Hugs and have a Wonderful Day!!!

Thursday, January 26, 2017

Congrats! On Your New Home


Hello CCD craft friends^^Eunji here.Today my first daily post time.I am so exciting~And this time made honeybee card.Made using stamp set.


I stared stamping honeybee and flower, honeycomb image stamp from on card stock with Memento black ink.And colored with Copic Sketch maker then fussy cut leaving thin white boarder.And drew the line with white pigment pen.Next the honeybee and flower, honeycomb image paper adhered to the 4*6 inch size brown card stock with foam tape.I drew the line on honeycomb image with white pen and drew the shinny, water drop, dot image on all background with Zig Metallic pen color is Gold, Copper, Silver.Lastly added sentiment paper piece sentiment stamp from with foam tape.


Thank you for stopping by and have a nice day~
See you soon~


stamp set
5x7

Zig Fudebiyori Metallic Pen- Gold, Copper, Silver


Wednesday, January 25, 2017

Warmest Wishes

Hi everyone, this is DT member Jeanin. Today I wanted to show you this shaker card that I made with images from the "Winter Cheer" stamp set. I went a little overboard with the sequins but this way the recipient has to work the shaker card to reveal the complete image ;) 


I started off die cutting the shaker card panel from white card stock using the largest scalloped die from the "Francy Frame" die set. I then cut the largest "Scribbled Circle" die from the panel and again from red card stock. Using red ink, I stamped the sentiment "Warmest Wishes" directly under the window. I also cut a piece of white card stock and that was a bit larger than the shaker pocket and die cut a snowy hill with a piece from the "Shake It Up" die set. Unfortunately, you can't really see it on the pictures. 


Then I cut a large enough piece of acetate and adhered it behind the window which also gave me the possibility to adhere the red scribbled circle to the outside of the window. Using foam tape I created the actual window that can hold the sequins and adhered the snowy hill into place on a silver card base. 
I stamped the image on mix media card stock and colored it in with Zig Clean Color Real Brush markers and also adhered it to the inside of the shaker card. All that was left to do was to fill it up with Fairy Dust sequins (please be careful and don't overfill like I did). For a finishing touch, I adhered the little star from the set to the left of the sentiment.

I hope you liked this shaker card. Have an amazing day and see you next time!

CDD products used:


Tuesday, January 24, 2017

Gearing Up To Party!

Hello everyone! Tatiana here from Tatiana Craft And Art! So excited to bring you my first daily post here on Craftin Desert Divas! Today I'm sharing a fun interactive card featuring a brand new stamp set from January Release called .


Love this cute set! It's very versatile and can cover many occasions! Today I have an example how you can create a birthday boy card out of it!
cdd_daily-post_-jan-2017-2
I started stamping a few robot images from set with a waterproof ink on Bristol paper, coloring them with Zig Clean Color Real Brush markers and fussy cutting leaving little white edge around.
I prepared my card base masking the bottom edge and added color using ink blending technique with distress inks. Finally I spritzed drops of pearlized water on top of the pattern to bring some interest.
cdd_daily-post_-jan-2017-3
Then I proceeded with an interactive part. I cut out with a craft knife a long narrow rectangle on a piece of a white card stock that was cut slightly smaller than the card base. To make my robot stamps slide across the card, I adhered little rectangle pieces of a foam tape to the images, put them in place and blocked with circles punched from a white card stock. Finally popped up the whole piece on the card base with a foam tape.
I felt like I still needed something else to tie all the elements together. So I protected the colored parts of my card and added some splotches of color using the same Zig markers I used on the robots. I finished adding some shimmer with a glitter pen and shine with Glossy Accents and didn't add any sequins this time since it could obstacle the interactive part.
That's all for today! Thanks so much for stopping by! Hope you like the idea and you'll give it a try!
tatiana-cdd-blk-watermark
ZIG CLEAN COLOR REAL BRUSH MARKERS:
n.36 Light Blue - n.42 Turquise Green - n.83 Lilac - n.80 Violet - n.25 Pink - n.91 Light Gray - n.95 Dark Gray
SUPPLIES:

Monday, January 23, 2017

You Make Me Smile

Hello everyone! DT Ale here from made by Alexandra sharing a card that I made using the adorable digital stamp
I started by inking the background using Distress inks and the I die cut the trees and the grass from which I also inked with Distress inks.
I colored the cute monkeys using Spectrum Noir Alcohol Markers .
To frame the little scene I used  and to finish my card I added some
For the sentiment I used ''You make me smile '' from   stamp set  and embossed using white embossing powder.
Thank you so much for stopping by! Have a great day!
Supplies


Newer Posts Older Posts Home