Friday, June 30, 2017

You're Precious To Me

Hello CDD Friends Waleska here to share with you a very magical card with our cute and famous Trolls and the very versatile Garden Border Die... Aren't you just loving all our border dies?


CARD DETAILS:

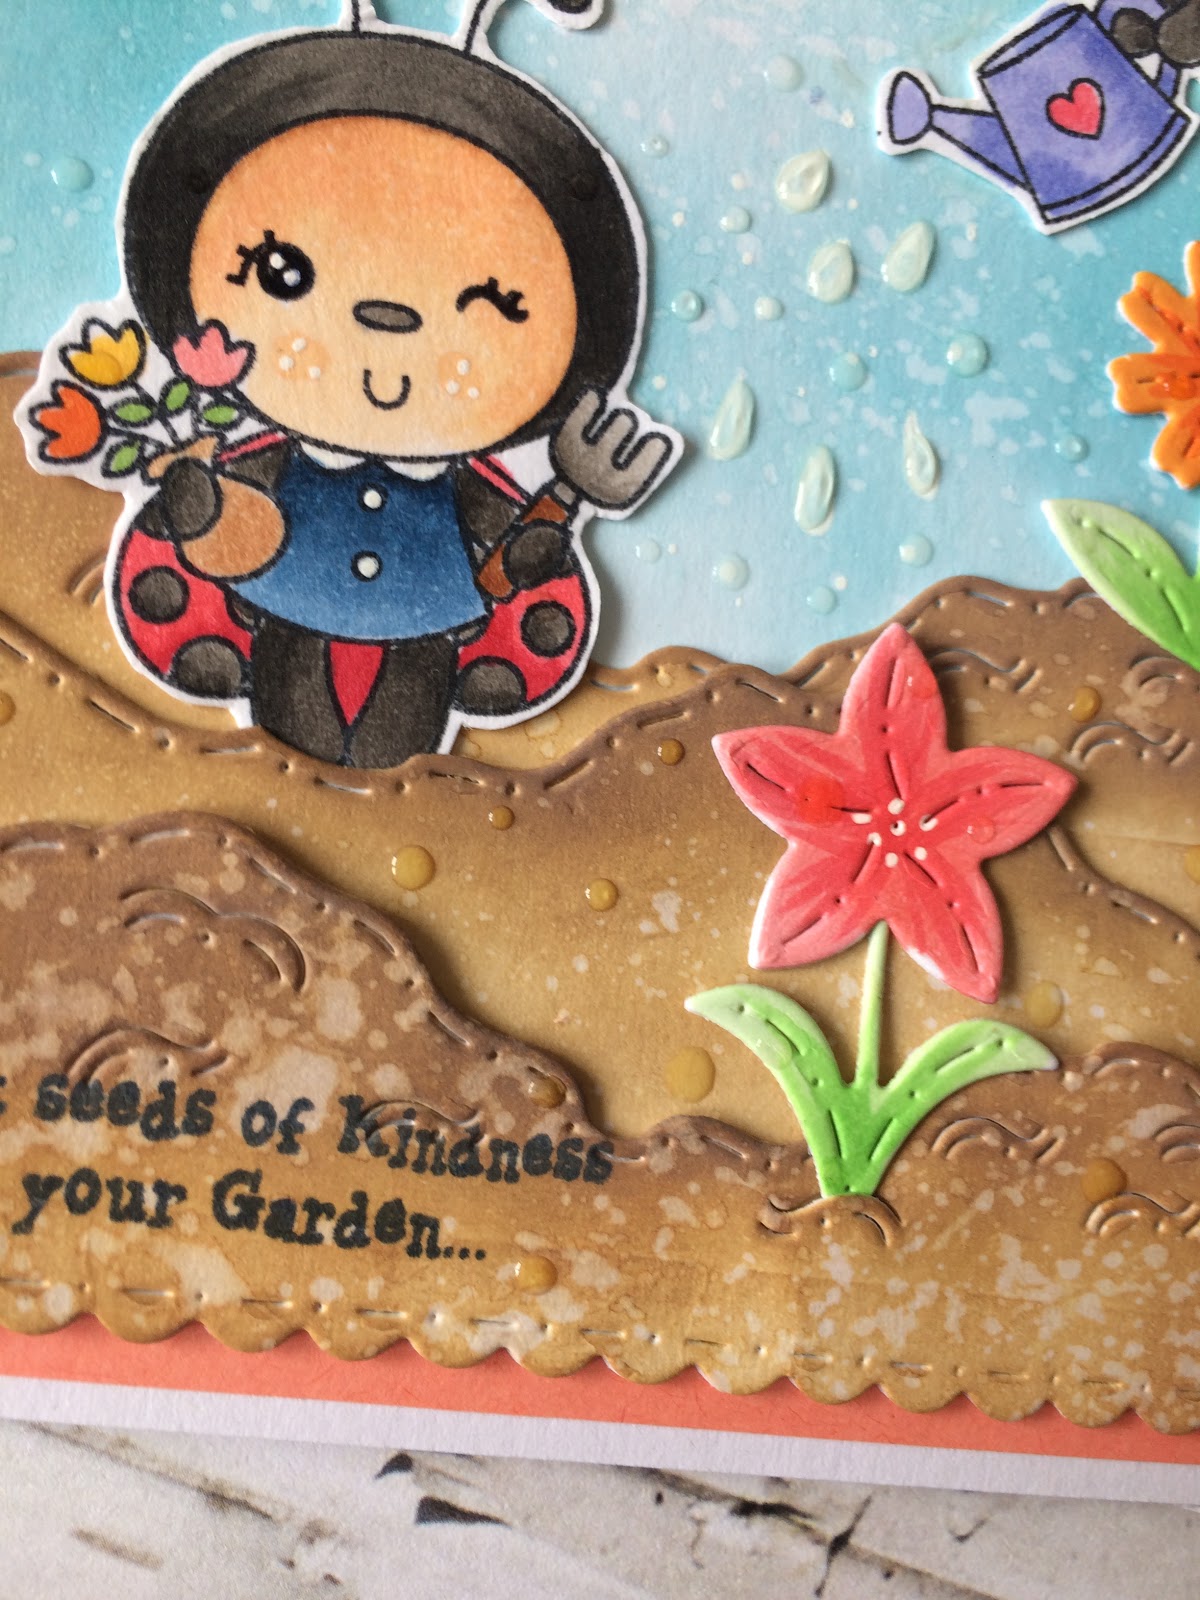
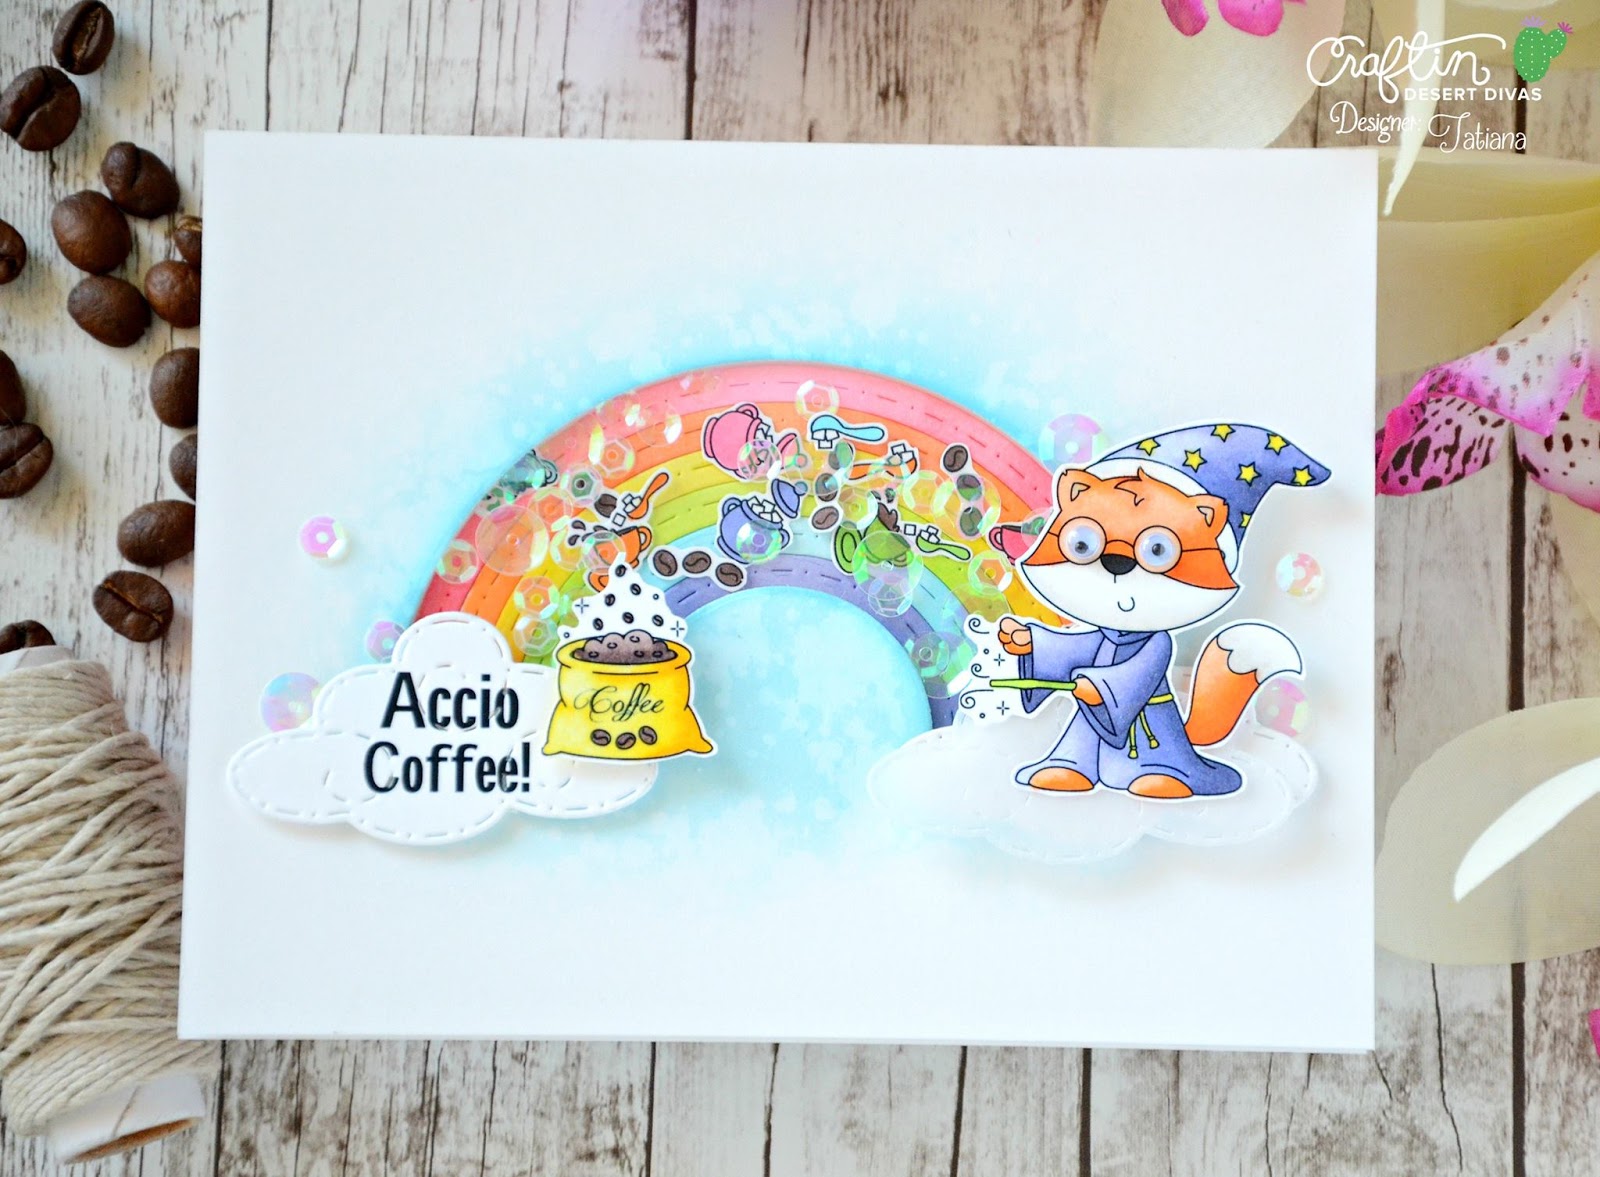
I started with the night sky, and my two favourite colors to create a very easy night sky are Distress Inks in colors Blue Print Sketch and Black Soot.  I put a light blend of the blue and added the black only on the edges and blend both to create the night sky.  I cut a longer piece of the border die to mask the border of the soil to create a light halo for all the gems, for that I used Distress Oxide Ink Fossilized Amber, for the soil I used regular Distress Ink Walnut Stain with water splashes.


I color all the Trolls  with markers to coordinate the scene.  For the gems I used the same colors of the Trolls and added stickles for sparkle.


I also added little white dots with a gel pen along the card  to create stars and with Versafine Ink I stamped the sentiment.

I love how you can tuck almost anything into the Garden Border die... I tucked the little diamonds, but you can put vegetables, flowers, plants this is a great die for many different types of cards.


I hope you can be inspired to create a magical card for someone special for you, and you can create night sky very easy.

Have a Wonderful day!!


Products Used:


Thursday, June 29, 2017

Monster Carnival Planner Pages


Hello everyone!! It's Nancy from the DT here to share a planner layout using the brand new Monster Carnival set from the Craftin' Desert Diva's June Release. I'm a huge fan of monsters, so when I saw this set I went crazy for it!! This is my favorite set from the release. However, it's really hard to make that statement as all the sets are amazing!!

I thought, if monsters were going to a carnival, they would probably take some selfies or visit one of those old fashioned photo booths. I knew that I wanted the monsters to have a strip of photos to take home with them. But typical photo booth strips are a little plain, so I googled film strip clip art and picked an image that was more appealing. I printed out the image, then used it as a template for my photo strip. I traced the outline of the photo strip onto black card stock in two sizes. I wasn't sure which size I would end up using. Then, using a craft knife, I cut out the picture portions of the template. Now I had a template for my photos. I traced the inside of the photo template onto sticker paper to give myself a frame to work within. I knew that I wanted each photo to contain multiple images to create a scene, so I first stamped all my monsters and set pieces onto sticky notes. I cut out all the images and set them aside. Then I masked around each of the photo frames. I placed the stamps in the frames before inking them to get an idea of what I wanted. Once I was happy, I did all the actual stamping. When finished, I removed the masks and began to color. I wanted everything to have a vintage feel, so I kept the colors in shades of black and gray.


I followed similar steps on the other side, but I didn't need a template to create the polaroid photos. I used washi tape in silver, black, and white to keep with the theme and accented with black and gray planner stickers.
Now remember, I said I had made the film template in two different sizes. As I wasn't sure which size I would end up using, I stamped and colored images for it as well. When the layout was complete, I couldn't bear to get rid of the smaller film strip that I hadn't used. I finally decided it would make a great shaker bookmark. I used my fuse tool and a sheet protector to create the pocket for my shaker. I filled the shaker with silver, gold, and iridescent star glitter. I then carefully sealed the top, and the shaker was complete. The support strip for the bookmark was a bit trickier. Because of the awkward shape of the shaker, if the support was set in straight, the book mark would be crooked. I ended up putting the support at an angle so that when the bookmark is attached to the planner it would sit straight. I then used the cover of my planner as a guide to punch the holes in the support. I think the bookmark came out great!! And I didn't waste any of my pieces!!
I hope you enjoyed my layout. This is a concept you could adapt for many others projects as well. Thanks for stopping by. Please make sure you check out the Craftin Desert Divas Event Page on Facebook for more inspiration and amazing projects from the design team.

Supplies Used:


Wednesday, June 28, 2017

Espresso Patronum!

Hi everyone and welcome to the Craftin' Desert Divas Blog.  It's Christine here with a fun card to share with you today.  I'm a lawyer, but recently made the leap to make crafting my full time job and I haven't looked back since.  I'm thrilled to be working with Craftin' Desert Divas.  I hope you enjoy my card for today.


This card uses some images from the utterly adorable .  Here's a full view of the stamp set:


How adorable are these little guys?  I Just love them.  Here's my card for today:


To create this card, I first colored the adorable images with my Zigs and a water brush.  I then used my , my , and my  to create the background.  I then used some water to create the distressed look.  I then used the  to cut out both layers (the image panel and the brown cardstock underneath).  I adhered my images with dimensional tape and then added some sequins from the .  What do you think?


Well, I sure hope you enjoyed today's card.  Thanks so much as always for stopping by the Craftin' Desert Divas Blog.  Have a wonderful day :)


Hugs, Christine


Tuesday, June 27, 2017

Plant Seeds Of Kindness In Your Garden...

Hi everyone DT  Natalie here,
I'm up on the blog today to share my newest card, where I used the adorable  , aren't they the sweetest?!

I have been loving working with the new oxide inks and I thought they would be perfect to get me started. To make this lovely garden scene card, I cut two rectangles using the . The first rectangle I used to make a sky blending the oxide inks, and . The second I used for the mud, blending oxide inks and . To give it an added texture, I sprinkled water on the two leaving for a few seconds then drying off with some paper towel. Next it was time to cut the soil to give the card extra layers using the . I also cut out some flowers from the and clouds using coloring them with Copic markers.
Here you can see the 3 layers of soil and how I placed the flower in the cut outs so it looks like it's really growing out of the soil! The bee and ladybird were coloured with copic markers, then finished off with a Copic liner pen and white gelly roll pen to make the eyes really pop and add three cute dots on the cheeks.
When the card was put together, I added to some water droplets to give the effect of it raining and the watering can sprinkling using glossy accents. I hope you like it. I can't wait to colour in these cuties again they will forever be a firm favourite in my stamp collection! 


Monday, June 26, 2017

Totally Awesome

Hello everyone! DT Ale here sharing a card that I made . This card is a bit different from the cards that I am usually doing , and really enjoyed a lot the process.
So for this card I started by taking a piece of watercolor paper and just playing with colors. I wasn't sure if I would like the end result but after messing a bit around and drying the paper in between the coloring I really loved how this turned out.
After the color was completely dried I die cut my panel using Crazy Stitched Frame dies and then took the word dies from Greeting word dies and die cut it twice to have some dimension to the words.
Next I adhered the words to the main panel using Multi Medium Matte and adhered the panel to the card base using foam tape.
Also I am in love with the Nuvo drops - Morning dew the are just amazing and Craftin Desert Divas are having it on the shop :)
Thank you so much for stopping by today! Have a lovely day
Supplies

Sunday, June 25, 2017

Guest DT Call


We are looking for several guest designers each month for the months of August, September, October, November and December.

You will be given one clear stamp set from that month's release. You will make at least 4 projects to share on at least 3 social media platforms/sites/groups a certain week of the month, after our monthly release.

Each guest designer will get:
1 clear stamp set to work with.
A 25% discount code to the CDD shop for a one time purchase.
CDD will also share your projects on our CDD Instagram account and CDD FB page. 

We are looking for crafters who love CDD and love to share on social media.

How to apply:

1. Send 3 projects that best showcase your style. Doesn't have to be CDD projects, but it won't hurt if you do!!
2. Tell us what social media platforms you would share your projects on. 
3.  Links to social media accounts.
4. List of current DT you're on.

We are looking for crafters who can color images and take amazing photos. They must showcase the stamp, be nice and bright photos.

You must be a member of our group on FB,
 as you will be sharing your projects in our group.


Send an email to  
Subject of email: Guest DT call

Guest DT call ends 7/7/17


I look forward to your email!!

Tara


Wishing you a lifetime of happiness

Hi everyone, here with my last post as a design team member for Craftin Desert Divas. I've decided to step down for the upcoming term but I had such a wonderful time at this incredible and talented team!

For my final card I created a rather unusual one for this time of year. But I guess everybody needs some cooling down during these hot summer months. I printed these cute penguins on some mix media card stock and colored them in with Zig markers.


I decided to create a distressed background using different shades of blue. I then die cut the distressed card stock with the medium square of the Inside Scalloped Square dies and keep both the frame as well as the inside piece. Using some foam tape, I adhered the square on a standard white card base and also adhered the penguins in the center.


To finish off the card, I stamped the sentiment "Wishing you a lifetime of happiness" with black ink below the square. 


I hope you enjoyed this last card from me. Have a great day! 


CDD products used 


Saturday, June 24, 2017

Accio Coffee!


Hello and welcome! Tatiana is here today from Tatiana Craft And Art and I'm sooooo excited to share with you my first release project featuring fabulous stamp set from Craftin Desert Divas June release!!!


stamp set is so amazing and I LOVE the fun sentiments you can find in it and, of course, it's so perfect for creating adorable scenes with the cute mischiefs, including some interactive elements to emulate a little bit of magic! Plus it's fantastic for all coffee lovers friends!!!


My choice was a shaker card made out of CDD set. I placed the coffee bag on one side of the rainbow and the fox wizard on the other and then filled the shaker part with some little accessories images from the same stamp set along with some creating the illusion of magic! I started by die-cutting the rainbow on an A2 size piece of a white card stock, inkbelding some blue ink around, coloring the rainbow die itself with copic markers and gluing it back directly to the card base. Then I stamped the cute fox wizard, the sentiment and a bunch of small images from set and colored them with copic markers as well. Finally I die-cut "Accio Coffee" Greeting on a cloud that comes with the same set I used before for the shaker part and fussy-cut with my scissors the colored stamps!

Assembling the card, I applied a piece of clear acetate to the back part of my front panel and once filled the shaker part, popped the panel on a foam tape. I also added some dimension to the clouds, the coffee bag and the cute fox wizard and just couldn't resist to add a few matching as a final touch! That all for today! Hope you like this bright and cheerful card! As always thanks so much for stopping by! And please, check Craftin on Facebook for more inspiration, amazing projects from the Design Team, freebies and awesome giveaways!
  COPIC MARKERS: YR00-YR02-YR04-YR07 BV01-BV13-BV17 E71-E77 Y0000-Y02-Y18 RV10-RV13-RV14 BG000-BG01 YG00-YG01-YG23 W00-W1 100

SUPPLIES:


More DT release projects:


Newer Posts Older Posts Home