Wednesday, January 31, 2018

Adding Dimensional Details With DT Waleska

Hello Friends, Waleska from  here to share with you some ideas on adding dimension with Glossy Accents and Nuvo Sparkle Dust.  There are many ways to add dimension and accentuate your cards, but this is a very easy way to use what you already have at home to create beautiful sparkle and shine to your card.


CARD DETAILS:

I started die cutting the new balloon border die from the Party Border dies and I cut individual balloons. 


I colored a bunch of balloons with oxide ink colors Cracked Pistachio, Worn Lipstick and Fossilized Amber and set it aside to create the card background.  For the background I put Cracked Pistachio Oxide ink with a little water to my mat and smooshed the card base.


After that I adhere  some balloons to a tape strip and put a first coat of Glossy accents and Nuvo Sparkle Dust to each of the balloons, because the dust is so fine the color of the balloons stay almost the same, I let it dry and after that put a second coat of glossy accents to seal all the fine glitter and give the balloons more dimension.


Here is a closer look of the balloons with the second coat of glossy accents and the Sparkle dust already sealed on the first coat... I looove all the sparkle and shine!!!


I die cut the awesome Stitched box die  with Kraft Cardstock (this die was made to have dimension and give a 3D look).


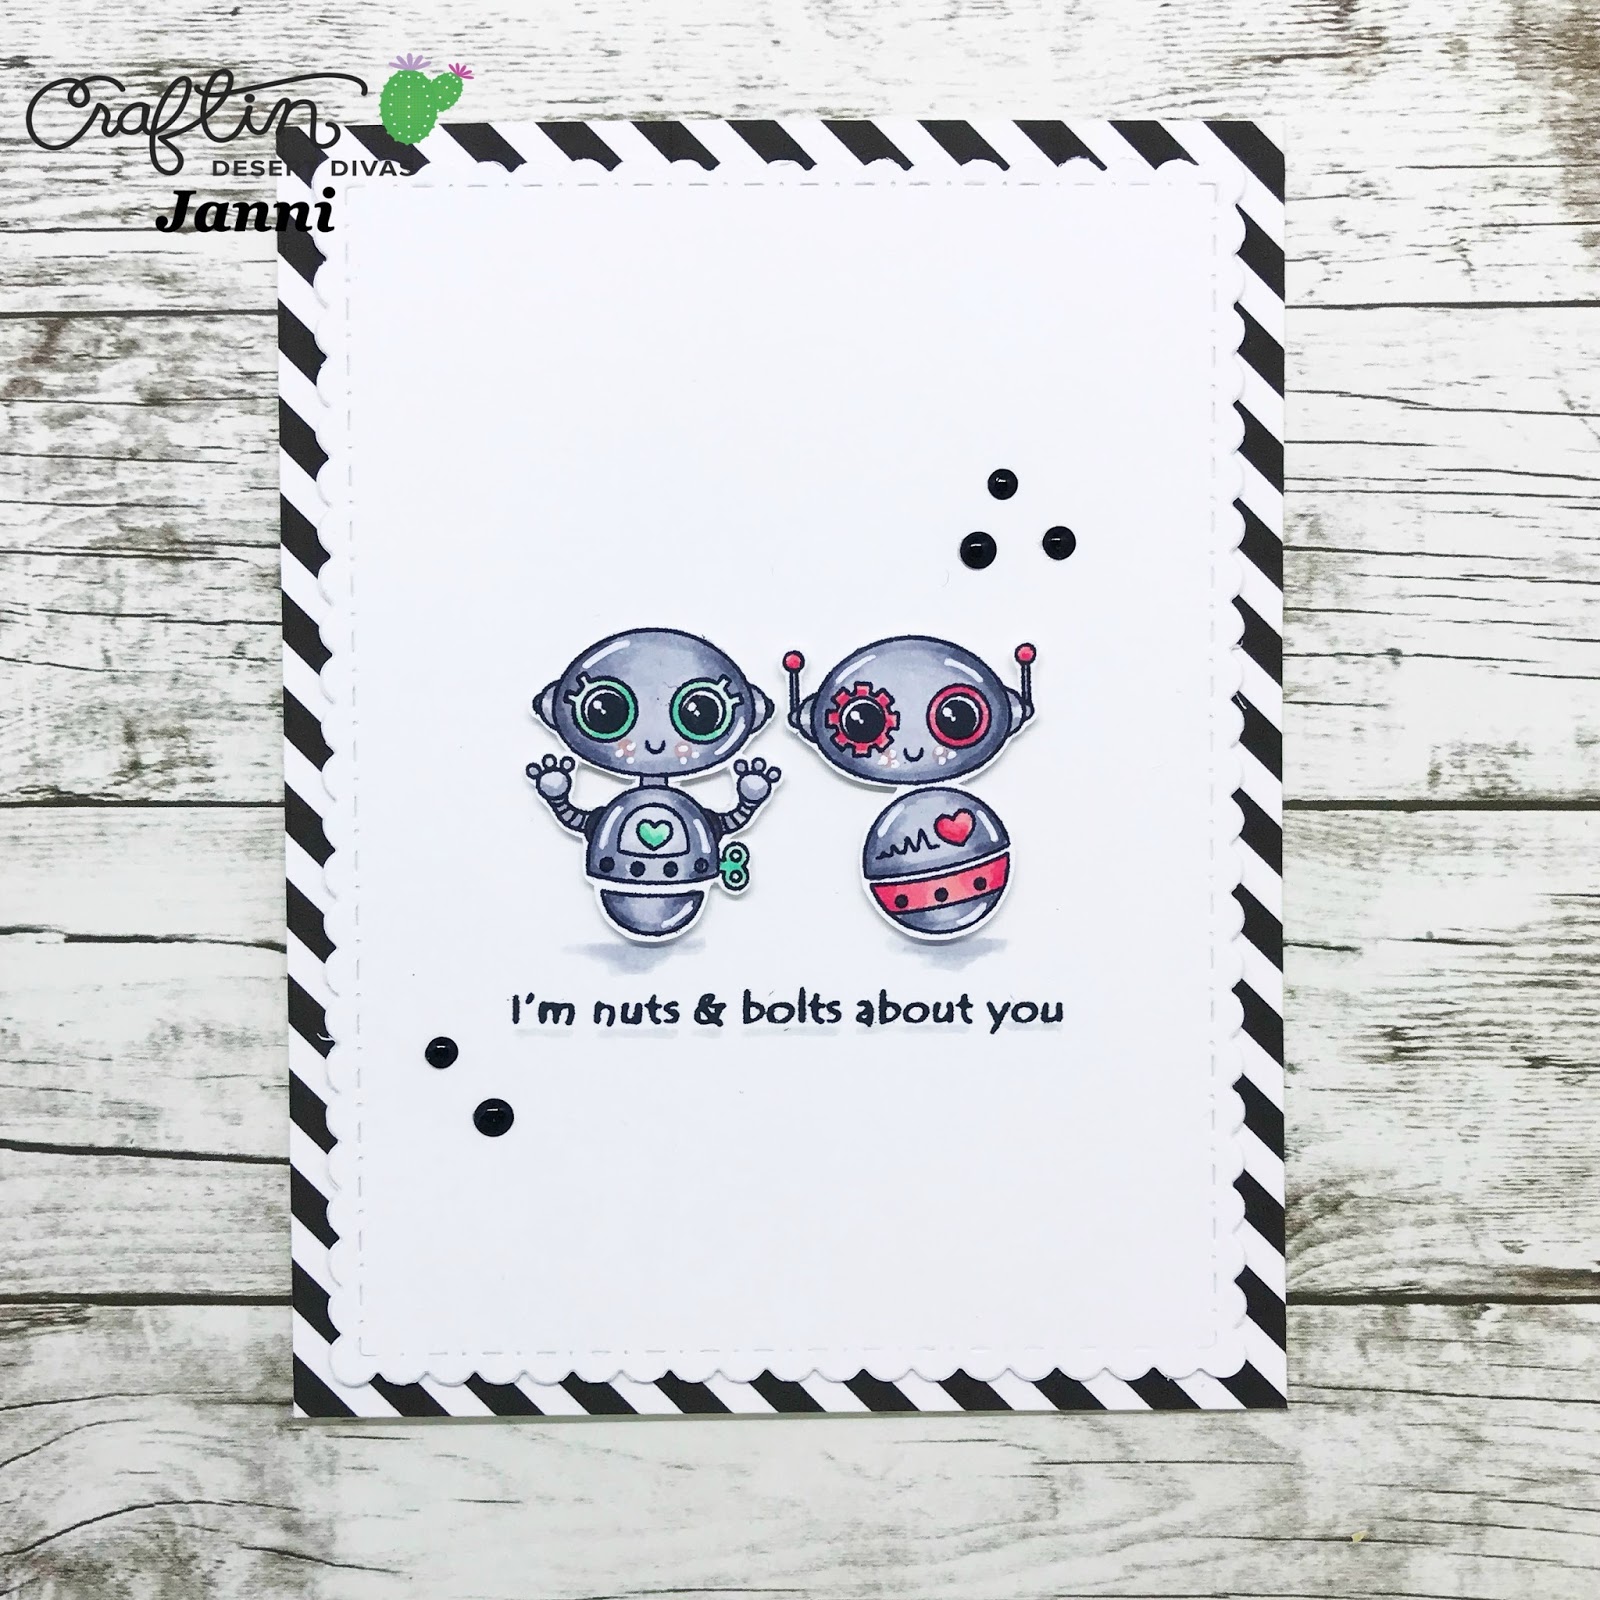
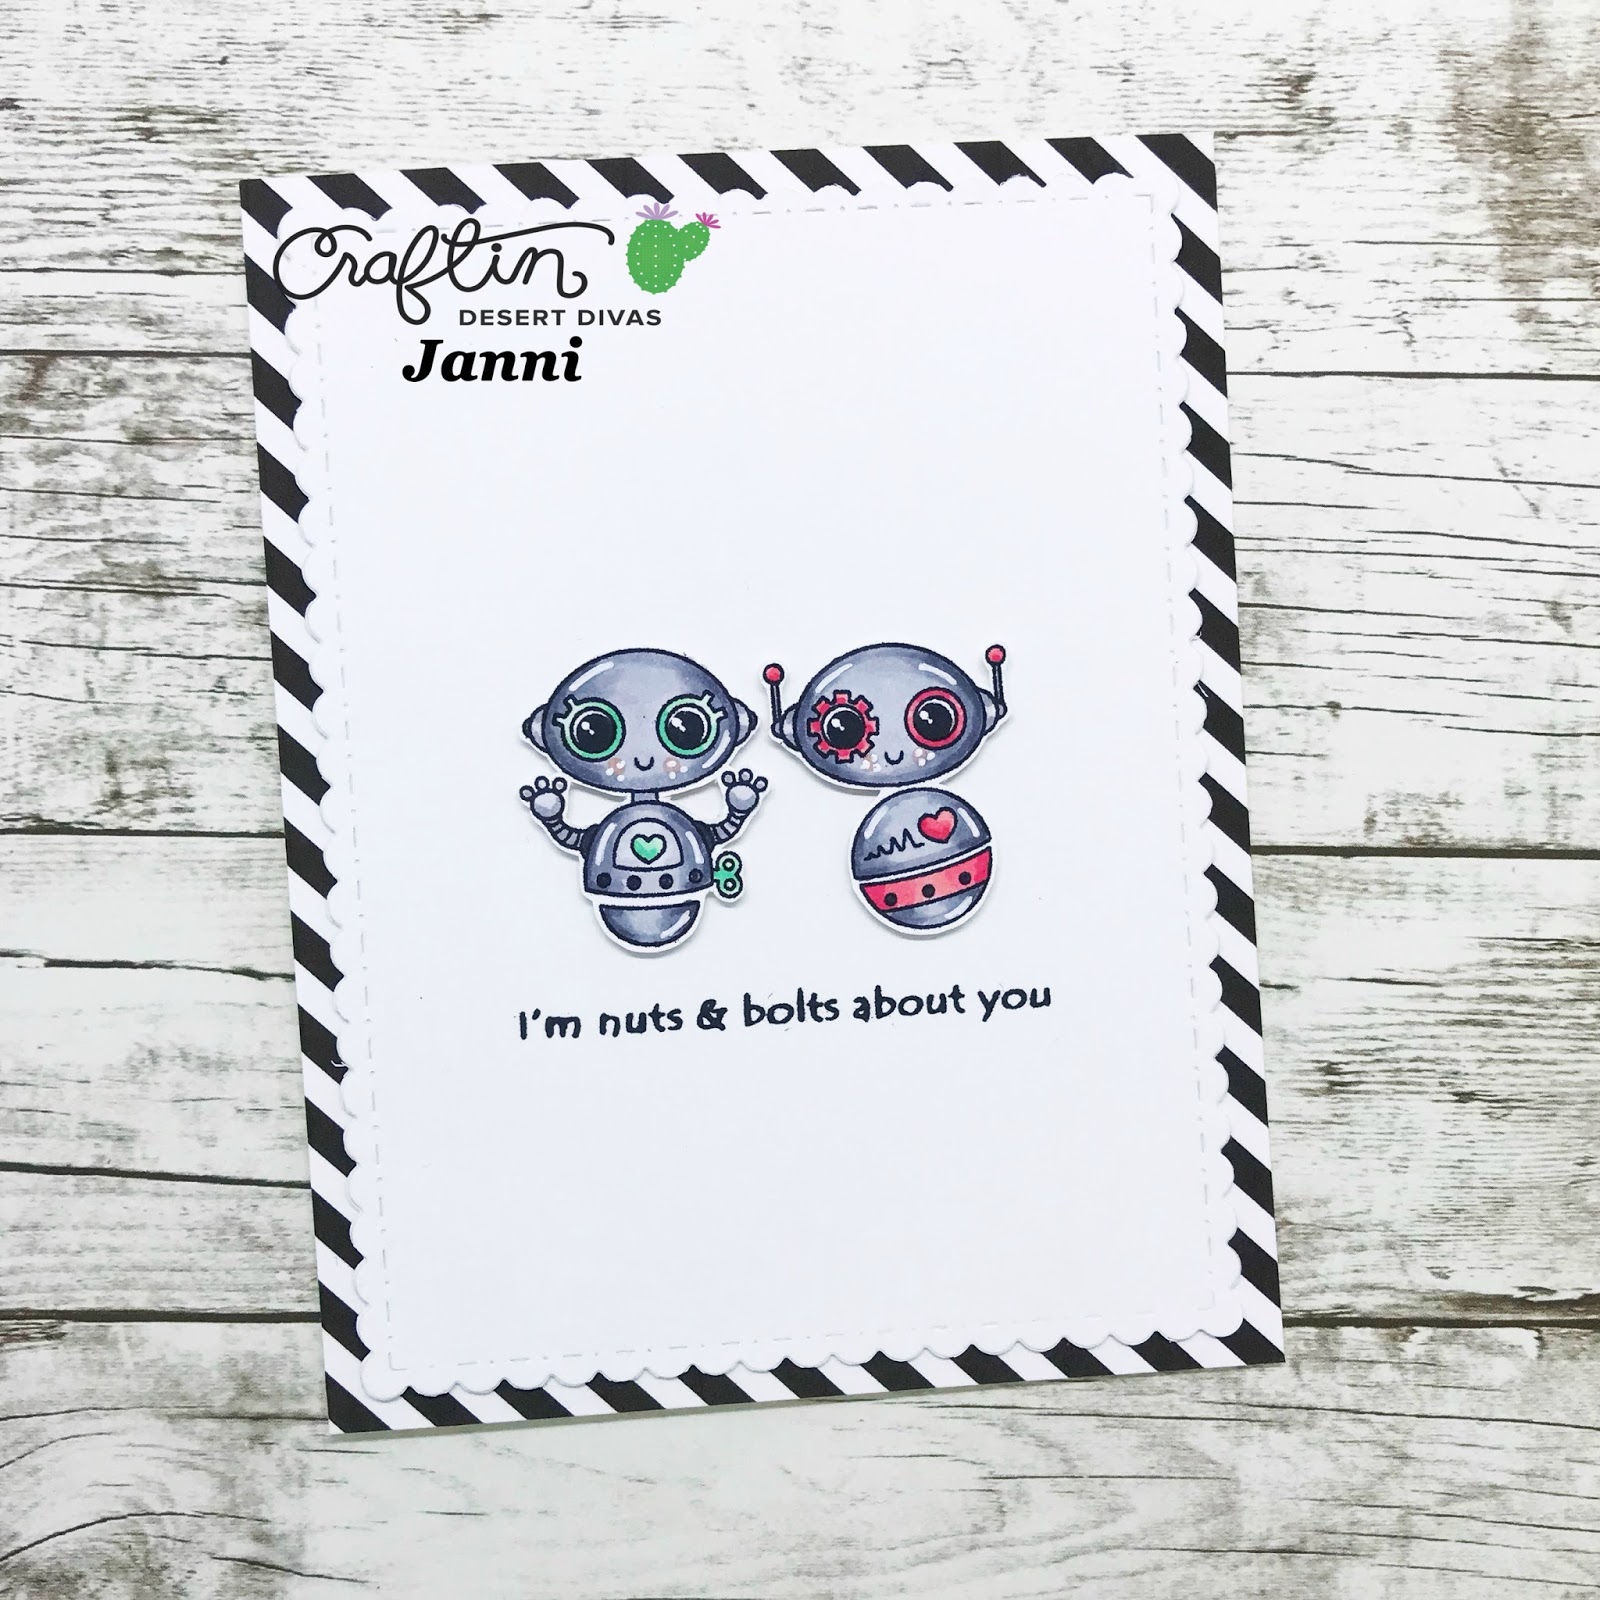
I adhere the piece with the balloon box to a Kraft cardstock and then to a white card base, I added some sequins for more color and stamp the sentiment!! 


I hope you like my card and can give this idea a try! This card design can send happiness to anybody special to you!  Have a great day!!!


CDD Products:


Tuesday, January 30, 2018

Adding Dimensional Details With DT Colleen

Hello Everyone! It's Colleen Tyler from Maple Syrup Designs here another blog post for ! 

Today I will be showing you how to add some dimension to your cards. There are many ways that you can add dimension to your cards, so I have chosen a few techniques that I use often to highlight as I walk you through the steps of this card. 

1.  Stamp your image and colour using your preferred medium, for this card I have chosen to use Craftin Desert Divas' Sparkle Stamp Set, stamped using Memento tuxedo Black Ink and coloured using Spectrum Noir Illustrator Markers with the Spectrum Noir Clear Overlay Pen.

    2.  Cut out a cloud template along the edge of a scrap piece of card.  Using your mini blending tool and Distress Ink in Broken china blend over the template edge onto the card, continue this process as you move the template all the way down the card.  This adds a background layer of dimension to your card by adding depth.  Stamp your sentiment in the bottom left of the card (leave enough room around the edge for a border).
 
3.  Use a glue Pen and trace along the edges of the clouds, sprinkle on some Frosting Powder and heat set. When heat set the frosting powder raises up and becomes white and frosting looking adding texture and sparkle to the card. 


 4. Use the Inside Scalloped Square die to cut out a frame, add foam squares onto the back of the frame and adhere to the cloud base of the card. 


5) Cut out the Unicorn and add a mini wobble Spring to the back. Both step 4 and 5 are quick and easy ways to add simple dimension to your card, and who doesn't like the added fun of a wobble spring to a card?! 


 6. For the Final step of Dimension I have added some Nuvo Drops in "Morning Dew" dotted around the card. I hope you have enjoyed and look forward to seeing what you make!   


Supplies  


Monday, January 29, 2018

Adding Dimensional Details With DT Susan

Hi Divas,
DT member Susan from www.stampbackandrelax.blogspot.com here on the Crafin Desert Divas blog today with a photo tutorial on adding dimension to a card using die cuts, a snow marker and sequins. This card was so easy. I combined several stamp sets and a few die cutting sets. 

Here is the finished card:


First I die cut the snow banks - it is the only way snow should come lol! I added a bit of shimmer with Wink of Stella clear shimmer pen.


Next I stamped the fence from Build a Scene and colored it with Copic C00, C0, and C1 and hand cut it out.


Then I took a card front (Neenah Solar White 90 lb) and colored it with Copics BG0000, BG000 and blended the two using a piece of cloth dampened with Copic Blending Solution. This blended the background and added some dimension in the form of texture.


As a finishing touch I added snow drops using a snow marker and sequins from the Polar Frost collection. The snow did not show up against the light background. Next time I will make it darker using Distress Inks. I adhered the sequins with matte medium.


Thank you for joining me today. The markers and supplies I used are listed below.


 Copic Markers:
Fairy: Face: E0000, E00, E70, RV10 Hair: E31, E33, E35, E37
Dress: R20, R22, R29
Coat: BG72, BG75, BG78
Penguin: W00, W1, W3, and W9
Tree: E43,E45, E47
Owl: E35, E37, E39


Craftin Desert Divas Supplies:


Sunday, January 28, 2018

Clean & Simple Card With DT Janni

Hi Crafty Friends, DT Janni here wishing you a happy Sunday.

Today I want to show you a Clean & Simple (CAS) card I made - I love CAS cards!


For this card I used 'Spare Parts' stamp set which is actually the very first stamp set I bought from CDD - one year ago - and Oh have I bought many since!!

I always use 'Memento Tuxedo Black' for stamping, it just works perfect with Copics. Then I cut out the stamped images by hand and then it's time for some coloring.

My coloring combos for today: C0-C1-C3-C5-C7, G000-G00-BG32, R32-RV25-R43. For the highlights I used a white gel pen.


I used with the scalloped frame die from 'Fancy Frame Dies' on white cardstock, and a black striped cardstock in 10,5x13,5cm.


I stamped the cute sentiment 'I'm nuts & bolts about you' on the scalloped frame cardstock again with ' Memento Tuxedo Black'. Don't you just love that sentiment!


I added foam dots to the back of the robots and placed them right above the sentiment, so simple but still beautiful.


As an extra detail I added shades beneath the little robots and beneath the sentiment using Copic C1. I added some drops of Nuvo Ebony Black for the last touch.


I hope you enjoyed my card - see you soon again.

Hugs,
Janni
     Products used:


Saturday, January 27, 2018

Clean & Simple Card With DT Lynnea

Hello, everyone! It's Lynnea from Sparkliie Creations and I have a clean and simple Valentine's Day card to share with you! It's no secret that I LOVE taking little images and creating backgrounds with them, so here's how I do it! Let's start with the full card!


Isn't it just too cute! I'm a lover of little creepy things - not that lizards are creepy...I seriously considered using the snake image because I love them!! Let's get started with the tutorial!


Here's a few of the supplies I will be using - some white paper cut to 4.25" by 5.5", Memento Tuxedo Black ink, and the Rockin Reptilians stamp set. I stamped the little lizard all over my paper making sure to rotate my image to give the look of lizards crawling all over my card.


Next I chose some Copic marker combos- the lightest lizards are R81 and R83, the medium lizards are R85 and R25, and the darkest are RV09 and RV17. Honestly, there's not much of a difference between the medium and dark lizards, so you could skip and just do 2 different colored lizards, but once I started I decided to keep going with the 3 color combos. I did simple blending - putting down a line of the darker color along the curve of the body with the spots and then coloring in the rest of the lizard with the lighter color.


Once the panel is colored it's time to fix any mistakes and embellish a little bit! I used a white gel pen to cover up any areas where I had gotten outside of the line. The black Nuvo Drops are PERFECT for adding dimension to each little spot and to the eyes. You can see here in this photo that I goofed on a few of the eyes and added too much - no problem! In the final card I turned the panel upside down and covered it up with the sentiment!


Speaking of sentiments...I grabbed the new Happy Sentiments stamp set and a banner from the Flag Banner Dies and curved my sentiment to fit into the die cut banner.


To add to the sentiment I die cut the word "happy" from the new Happy Dies - black for the word and white for the shadow. I added some clear shimmer to the black cardstock to make it pop!


I popped up the "happy" with foam squares and adhered the banner flat to my card - making sure to cover up those wonky eyes!. That's all! Simple and easy enough! Click the photos below to check out the supplies I've used today!

 Sparkliie Creations Blog

SUPPLIES


Newer Posts Older Posts Home