Thursday, March 31, 2016

Happy Birthday

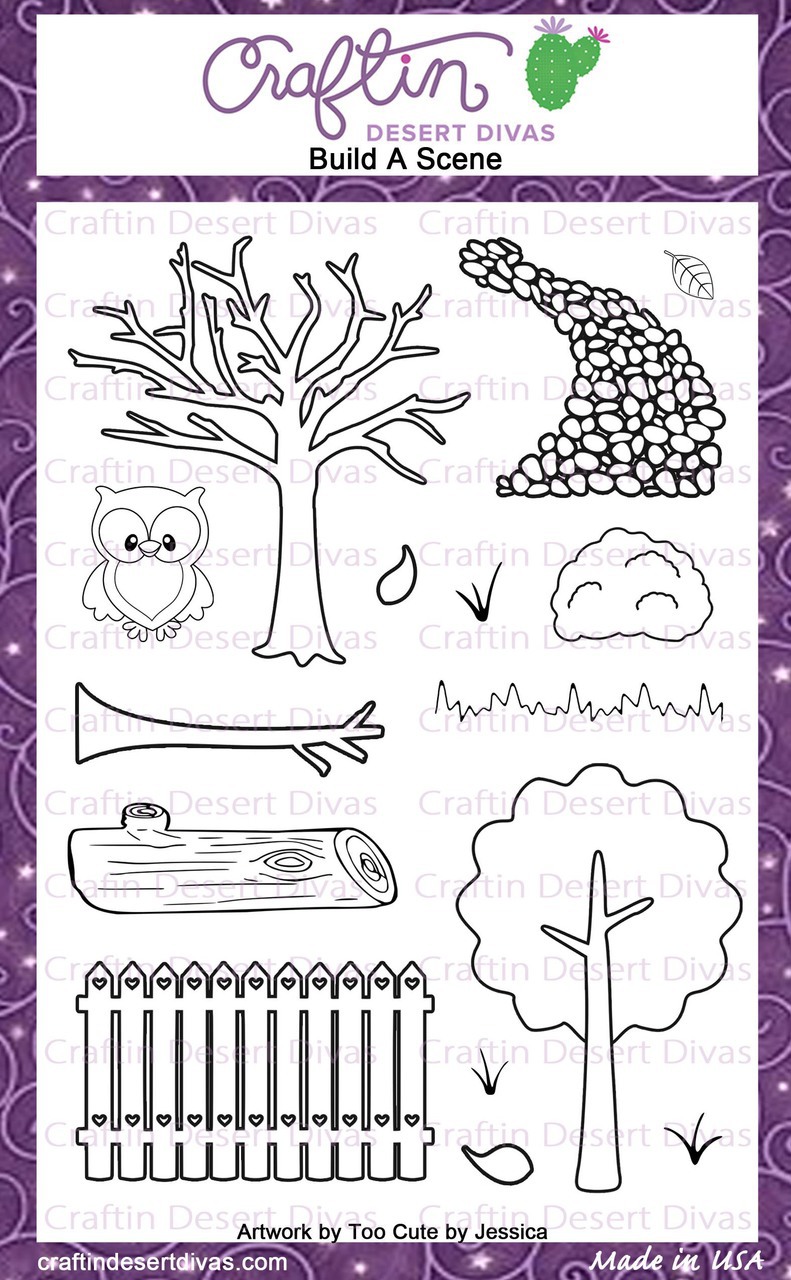
Hey CDD Fans!  DT Steph, aka Paper Piecing by Steph, here for another Throwback Thursday.  Today I am showcasing and stamp sets along with .  

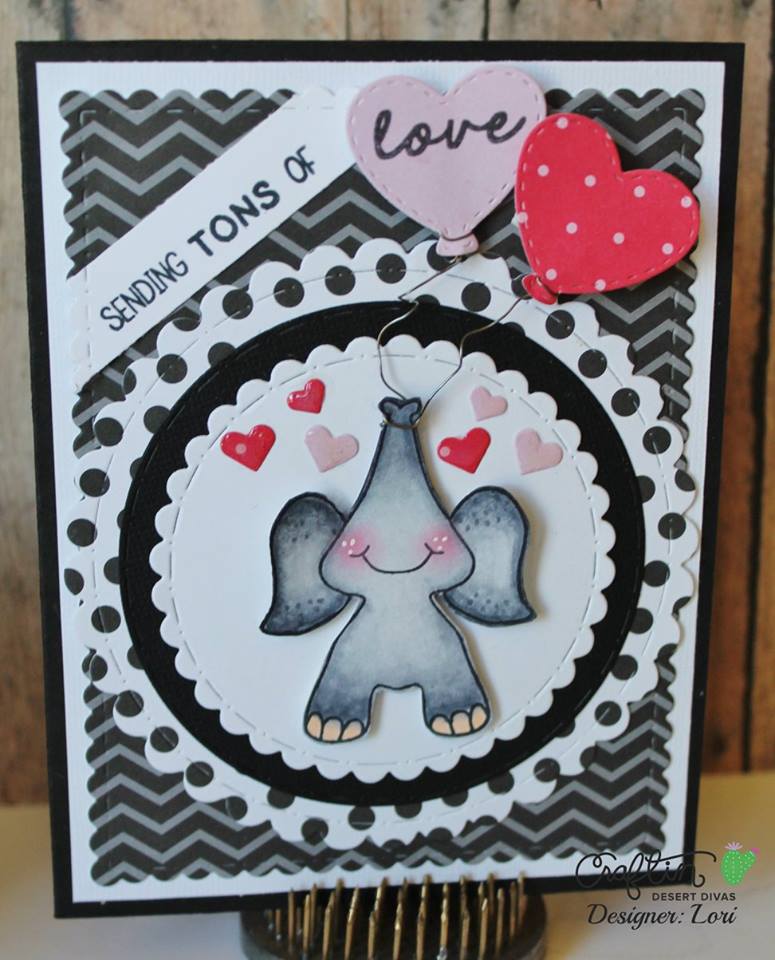
Here is what I created.....


I started off watercoloring stripes for my background on watercolor paper using Tim Holtz's distress paint in black.  I stamped the flowers from the Busy Bees stamp set on the medium sized stitched circle from Stitched in Circle Dies onto watercolor paper.  I then colored the images using Zig Clean Color Real Brush Markers.  I embossed the Happy Birthday sentiment from Say It Big stamp set.  I splattered the background and circle with black and gold paints.  I cut a black circle mat with my Cricut then die cut the large scallop die in pink from the Stitched in Circle dies.  Finishing off with a gold bow.  

CDD Products used: 


Thanks for stopping by!
steph


Wednesday, March 30, 2016

You're The Fairy Best

Hello Friends...
It's Jan here from handcraft hobby. Today I am on Craftin Desert Divas' Blog sharing with you my projcet. I am falling in love with this stamp set.  It's fully packed with many pretty images like Fairy, Mermaid, Unicorn and many more.  Today I chose Fairy image to made my card..

And here it is

I used alot of masking technique in this card.  Started by stamping my mashroom then masked it off by stamping again on masking paper or post-it note and cut it out.  Then I stamped the log and masked it off and I moved on to the tree and also masked it off.  I then stamped my main image the fairy from stamp set as if she's floated in the air and I also masked her off.

The fairy and the mushroom are from stamp set.  The log, tree and grass border are from stamp set.  I then began to ink up my background using distress ink and also masking technique.  The idea was to make the scene as the light shining thru the fairy when she gives her blessing. *lol*  I used Mustard Seed for the sun light and Twisted citron, Mowed Lawn and Peeled Paint to make my forest scene..

Here is the closer look

After I've done with the background I took off all my maskings and began to color all my images with various copic markers.  I then stamped the grass border to fill up the bottom part of  my panel and also colored it with copic markers.  I then cut the panel using my and attached it to my black card stock to make a frame.  And adhered it to my light blue card based.

I stamped the sentiment at the top of my card. and used wink of stella on all over my fairy.  I used grossy accent on the wings and red stickles on the flowers.  To finish my card, I added alot of .

Here is the closer look at the sentiment and sequins

I hope you like it and Thank you for stopping by today.

Here are CDD's products that I used : 


Tuesday, March 29, 2016

Swimming by to say...


Hi and welcome, everyone! Lisa here from In The Crafting Cave with Tuesday's Tips/Tutorials. I have a fun project to share with partial die-cutting and a shaker card using the adorable

Under The Sea Shaker Card created by Lisa In The Crafting Craft
Who says the top of the card has to be straight? 
Under The Sea Shaker Card created by Lisa In The Crafting Craft

1.Using the Stitched In Circle Die cut the largest scalloped circle.
2. Using the smallest scalloped Stitched In Circle Die center and lightly make a few marks around the outer edge, move die-cut to the side for now.
Die-cutting with Craftin Desert Divas Stitched In Circle Dies

 3. Decide how you want to arrange the die-cuts. Easy so far, right?
Die-cutting with Craftin Desert Divas Stitched In Circle Dies

This is where it gets interesting. 
4. Position the edge of the die slightly over your pencil mark.
5. Place top cutting plate over the die and line it up with pencil mark and run through the machine. 
Remember you don't want to cut the whole die. 

Die-cutting with Craftin Desert Divas Stitched In Circle Dies

That was the hard part. 
6. Now you have to die cut the smallest scalloped Stitched In Circle Die to create the frame.
This is very important, be sure the die is UNDER the partial cuts or you will cut through them. 
All that work for nothing, what? 

Die-cutting with Craftin Desert Divas Stitched In Circle Dies

7. Stamp images.
Die-cutting with Craftin Desert Divas Stitched In Circle Dies

8. Color images.
Die-cutting with Craftin Desert Divas Stitched In Circle Dies

9.  Create shaker. Cut acetate using the largest straight edge Stitched In Circle Die and adhere to the back of the frame. 
Die-cutting with Craftin Desert Divas Stitched In Circle Dies
Using largest scalloped Stitched In Circle Die cut patterned paper, from the , add on the backside of , add , and adhere to die-cut patterned paper making sure to seal tightly. 
White cardstock for the card base cut at 4.25" x 5.5", layered with patterned paper and turquoise cardstock die-cut with . 

Join me at In The Crafting Cave with Lisa for all the details.

Here are the products I used:


As always, thank you for stopping by!
And don't forget you can find us at

 
&

Need inspiration? Be sure to follow us on

Sunday, March 27, 2016

CDD "Black & White With Splash of Color" Linky Party - Week 1

Welcome to another Craftin Desert Divas linky party.

The linky party theme is....


Share with us all your wonderful creations using "Black & White With A Splash Of Color".
We would love for you to play along with us!

Every other Monday will mark the beginning of a new semi-weekly linky party here. I will designate a theme and invite you to share projects you've made!!

And don't forget about the prizes! Every linky party will have a sponsor and a winner, plus a top 3! The winner will be announced on a semi-weekly basis. The more times you link up, the more chances you have to win!! Sponsors will be announced at the beginning of every linky party.

This party sponsors are...

CDD- 1 4x6 stamp set

CDD- One digi stamp of choice


TCBJ - $25 gift card.
(regular priced patterns)


Here are the DT inspiration projects.
 Be sure to visit their blogs for all the details.


Showcasing , and

Patricia- Scrapflower
Showcasing , , and

Nicole - Teachdanz
Showcasing , and
 
 
 Lori- got2bcrafting
Showcasing , , , and

Lisa B. - Our2AngelsInHeaven
Showcasing ,
  and

Linky parties are from Monday at 12AM Arizona MST thru Sunday 12PM Arizona MST.
Any projects you submit must be linked to your blog or online gallery. 
Projects must be NEW, no back linking, please.
Number of entries for this linky party is unlimited.
You may link up ANY type of craft project (layout, card, altered item, tag (etc) as long as it goes with the theme of the party.
Please link your project back to Craftin Desert Divas Linky Party.


Winners will be randomly chosen by random.org


"Photo Inspiration" Linky Party Winners


Join us for our next release....


CDD- 1 4x6 stamp set - #50 kristinasartcorner
CDD- One digi stamp of choice - #41 Dawn-Designs by Dragonfly


TCBJ - $25 gift card. - #42 Karen Letchworth
                                                          (regular priced patterns)


                                                Top 3 ....

 #6. Donna K.

#11. Leave a little sparkle

#25 I luv scrapping too
Congrats!! Prize winners please email me at Craftindesertdivas at gmail dot com to claim your prize. You have one week to claim your prize.

 Everyone may take a badge from the right side post to display on their blog.

Have a wonderful Sunday!! Join us tomorrow for a new linky party starting in the morning. 


Tara

Easter Wishes


Happy Easter

Hi and Welcome! Lisa here from In The Crafting Cave with today's 
daily post. I hope everyone is having a wonderful day filled with
family and friends. 

This is a picture of two Easter cards featuring a bunny and eggs in grass.

I used the new and Stamp Set to create these fun 
Easter cards. 
That adorable little bunny is from the  Stamp Set.
This is a picture of two Easter cards featuring a bunny and eggs in grass.

This is a picture of two Easter cards featuring a bunny and eggs in grass.

I used the new and the sentiment is from the .

This is a picture of two Easter cards featuring a bunny and eggs in grass.

I'm loving the .

This is a picture of two Easter cards featuring a bunny and eggs in grass.

Join me at In The Crafting Cave with Lisa for all the details.

Here are the products I used:

This is a picture of Craftin Desert Divas Stamp Set - Hunny Bunny

This is a picture of Craftin Desert Divas Stamp Set - Chilly

This is a picture of Craftin Desert Divas Stamp Set - Bunny Trail

This is a picture of Craftin Desert Divas Stamp Set - Build A Scene


This is a picture of Craftin Desert Divas Dies - Fancy Frame

This is a picture of Bunnyville 6 x 6 Paper Pad


Pastel Paradise Sequins


As always, thank you for stopping by!
And don't forget you can find us at

 
&

Need inspiration? Be sure to follow us on
Newer Posts Older Posts Home