Showing posts with label Favorite Nut. Show all posts

Tuesday, August 28, 2018

How to Create a Shaker Card: Step-by-Step with Saundra


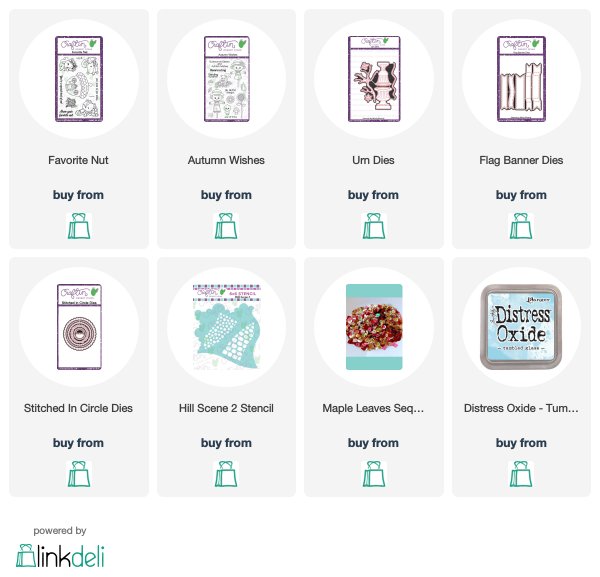
If you've been intimidated by shaker cards, today is your lucky day! Saundra is breaking down the shaker process in-depth so you can spend more time crafting and less time searching for instructions.

Read her post below and learn how to create a shaker card from scratch. Craftin Desert Divas carries a wide variety of sequins, dies, and images in that will have you making shaker cards like crazy! A full supply list is linked at the bottom of this post.
--------
Hello Friends! Saundra here to share a little step-by-step tutorial for creating a shaker card.

To create this shaker card you will need the following:

  • Cardstock
  • Acetate or clear packaging
  • Foam tape or Fun Foam
  • Adhesive
  • Versamark Ink or another sticky ink
  • Clear embossing powder
  • Stamps 
  • Dies

STEP 1

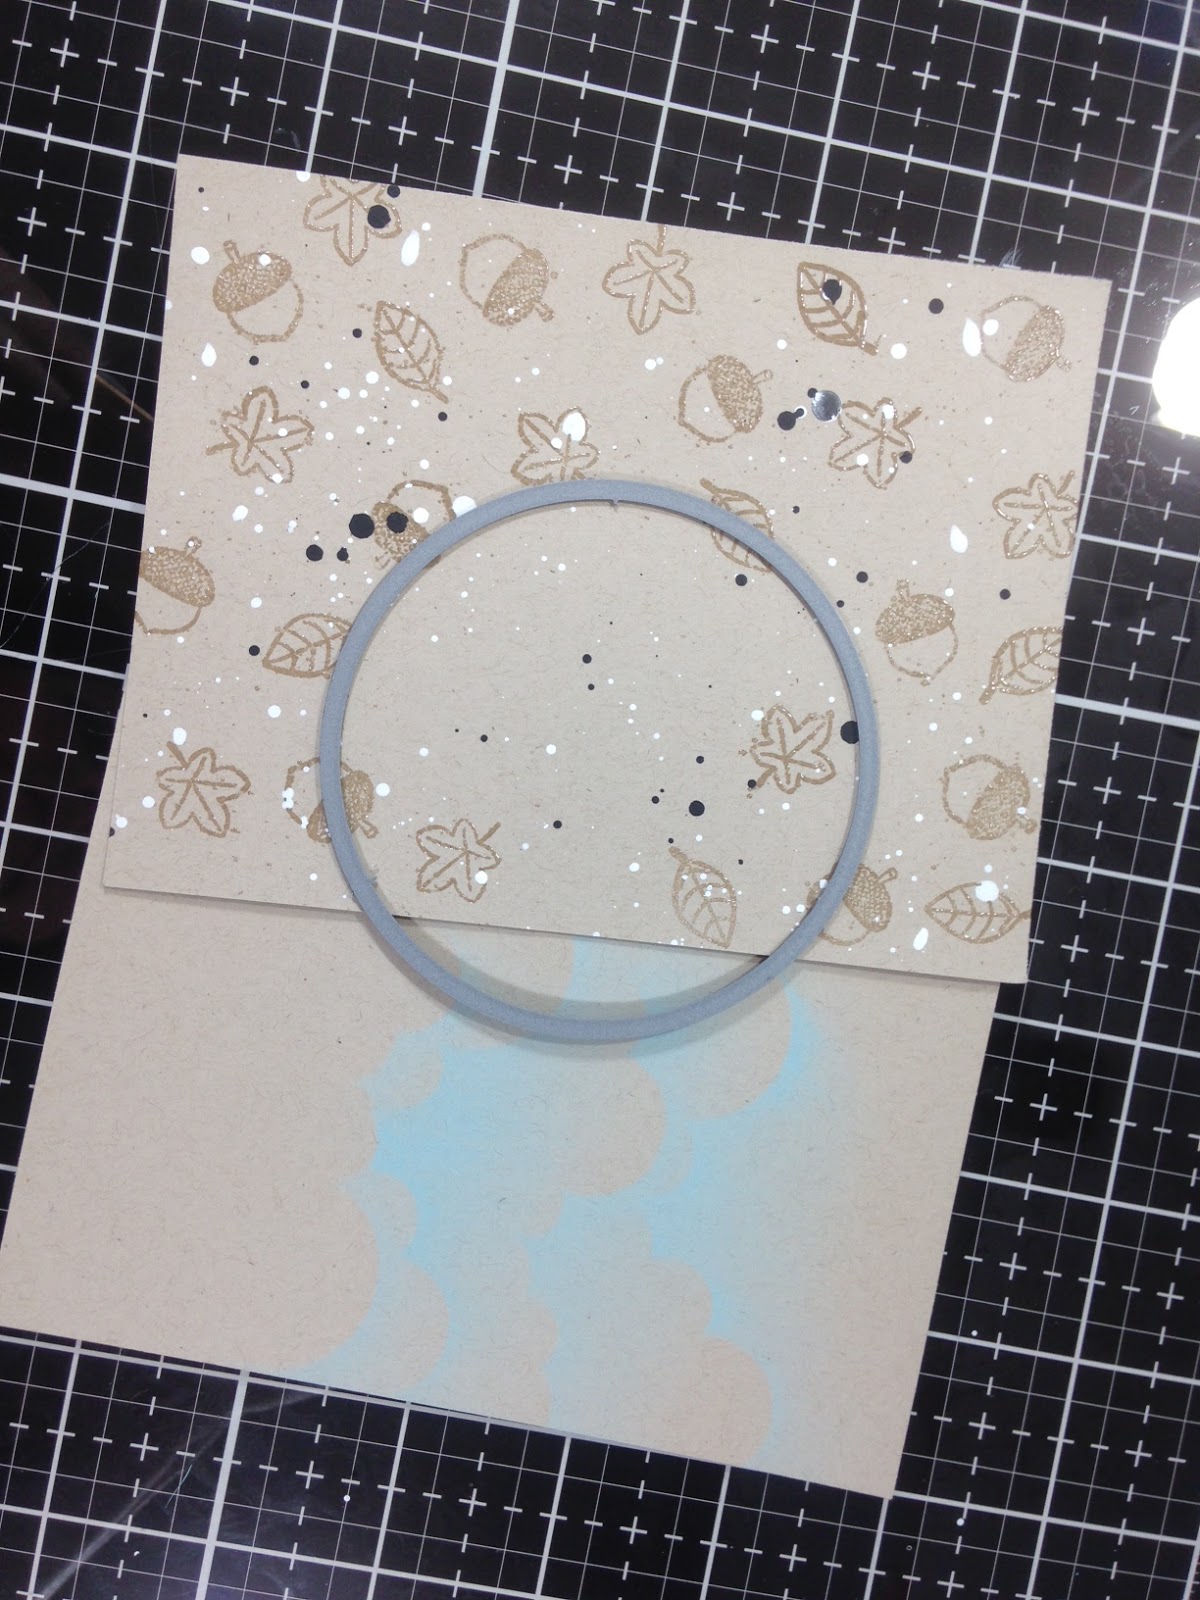
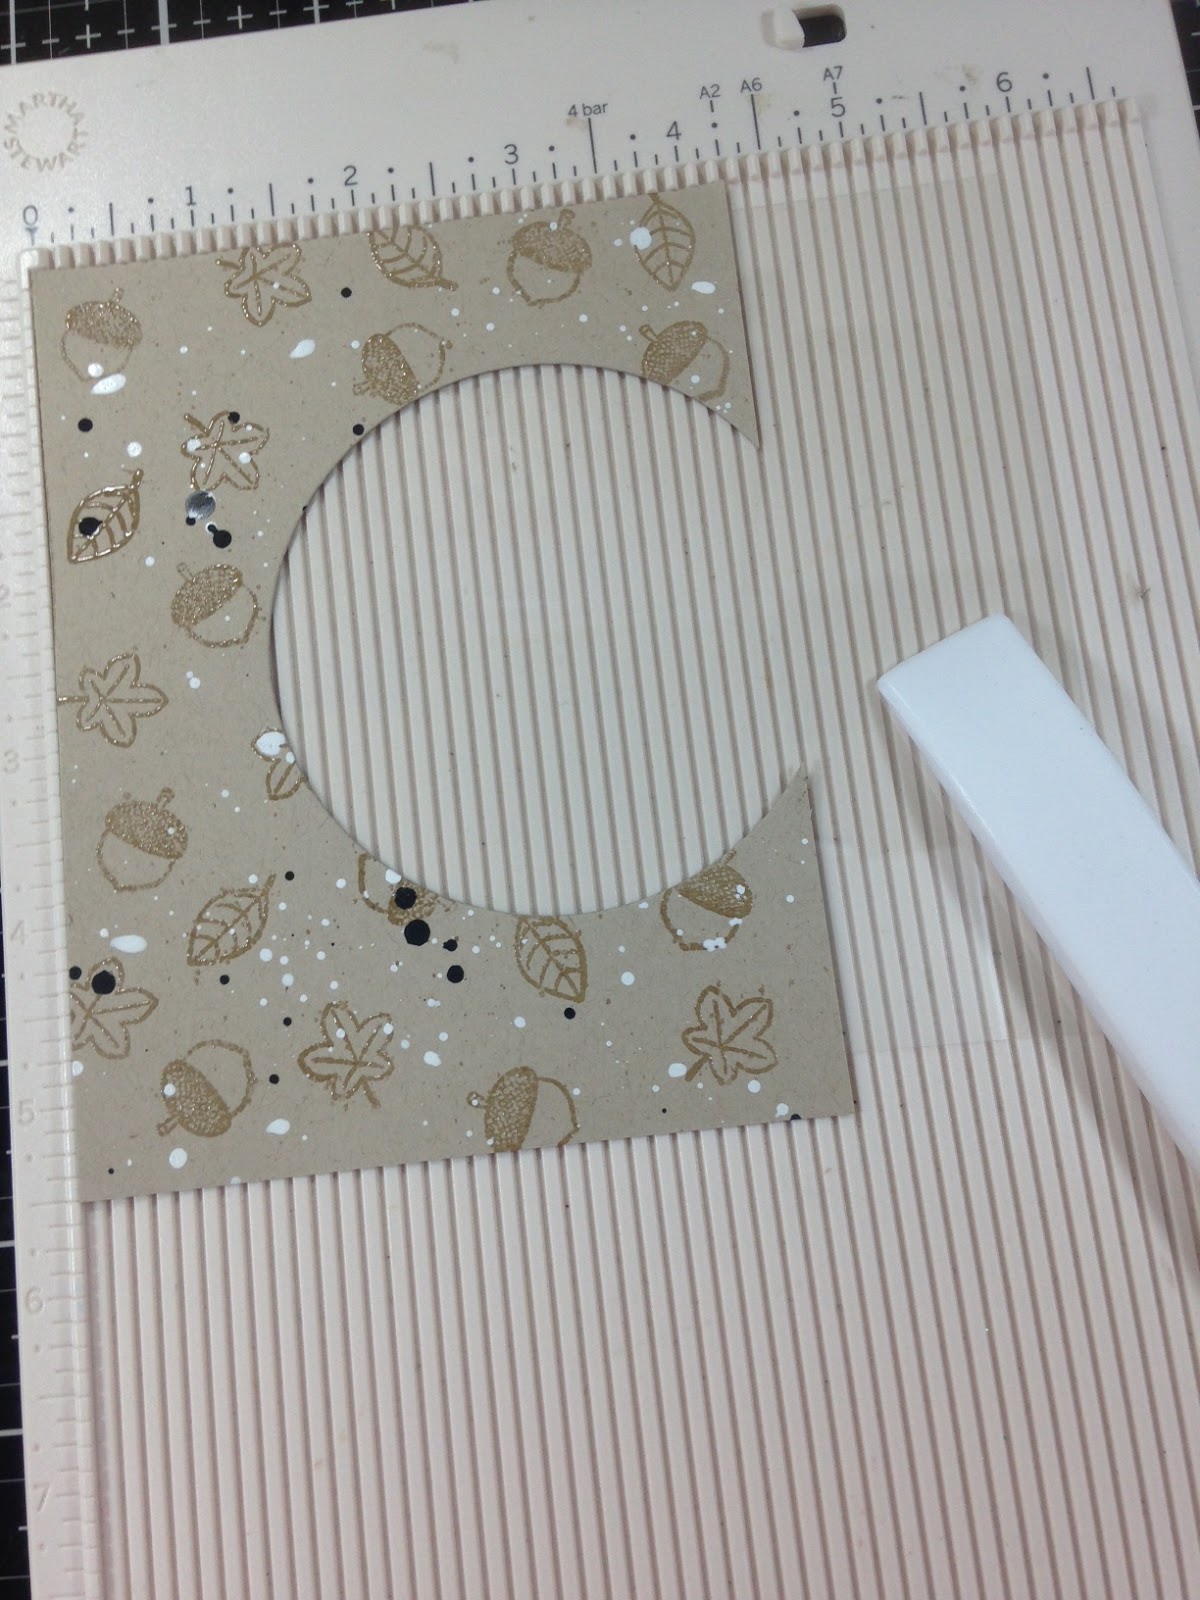
Step 1: Stamp and heat emboss your background.

For my background panel, I stamped the acorn and leaf images from onto some kraft colored cardstock using Versa Mark Ink and clear embossing powder. For added interest, I splattered some white and black acrylic paint onto my panel and set it aside.

STEP 2

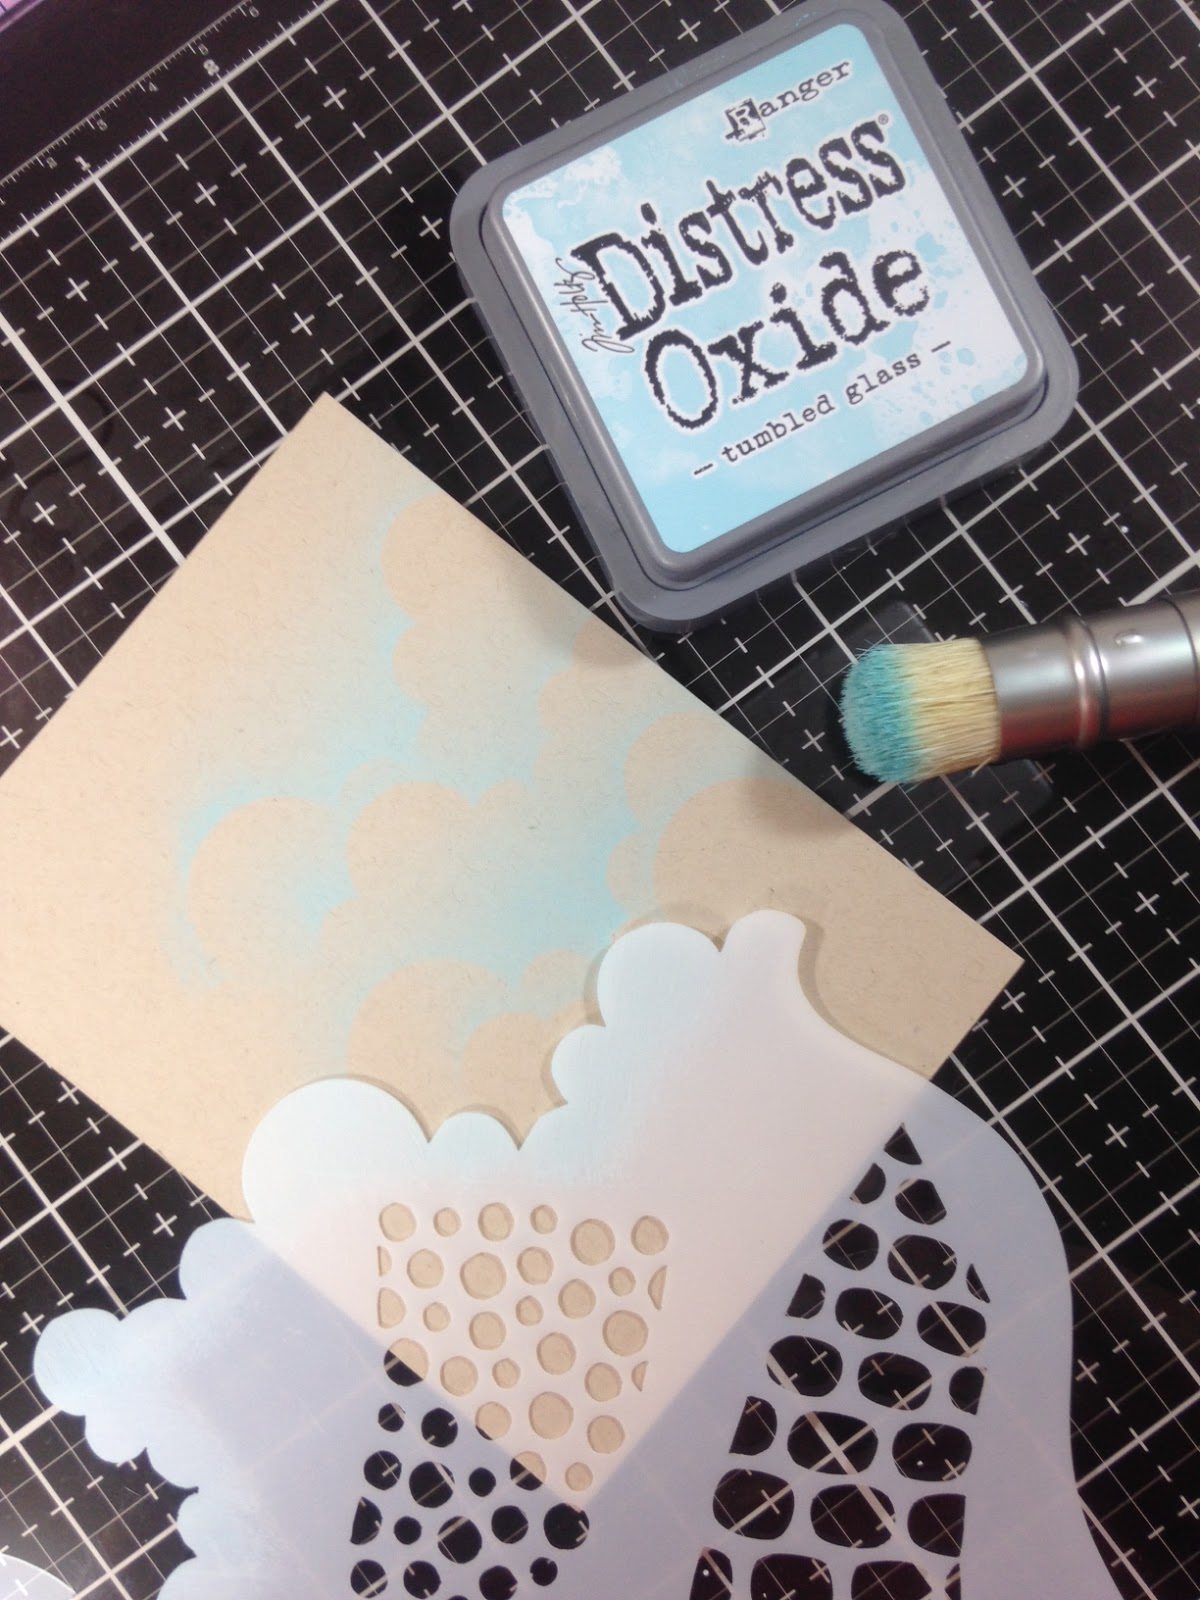
Step 2: Prepare inside panel.

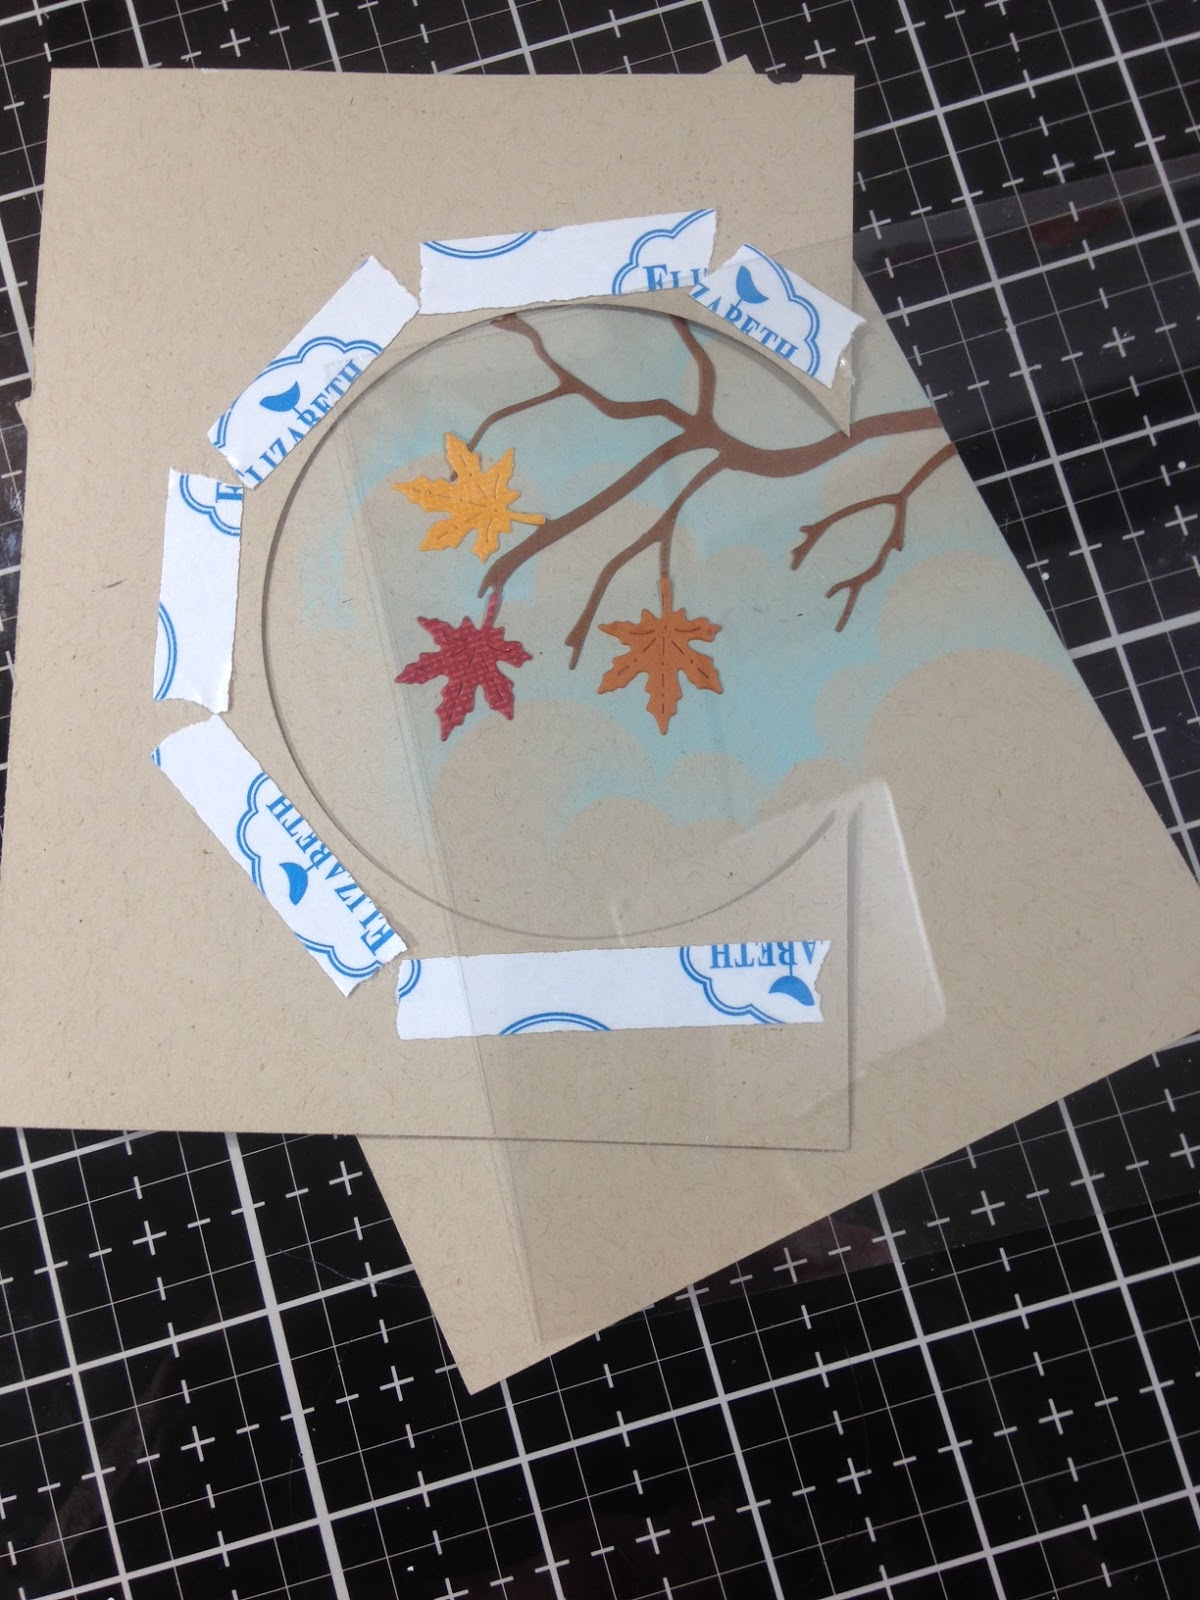
For the inside panel, I used and to create a few clouds. I already had a plan in mind so I only stenciled the area that I thought would be showing.

STEP 3

Step 3: Die cut front panel.

To create my window for my acetate I placed the on the edge of my panel, allowing it to partially hang over the edge. I thought having the window off center would give my shaker a bit more interest.
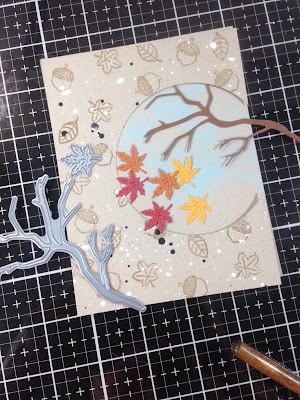
STEP 4

Step 4: Decorate the inside panel.

To decorate the inside panel I choose to use and various colors of cardstock to create a tree branch in the background.

STEP 5

Step 5: Add Acetate

Now it is time to build my shaker card window. I like to use Scor-Tape or double-sided tape to secure my acetate. Liquid glue tends to ooze and it takes a while for it to dry. I am not that patient! Once your adhesive has been added around the opening you will want to add your acetate. I cut my acetate so that it was big enough for the window with some hanging over the side. In the next photo you will see what I mean, at least, I hope!

STEP 6
Step 6: Score your acetate. With the acetate attached to my card front, I placed it on a scoreboard. You will want to score the acetate right next to the edge of the card and again about ⅛” from the first score line.

STEP 7

Step 7: Begin window assembly.

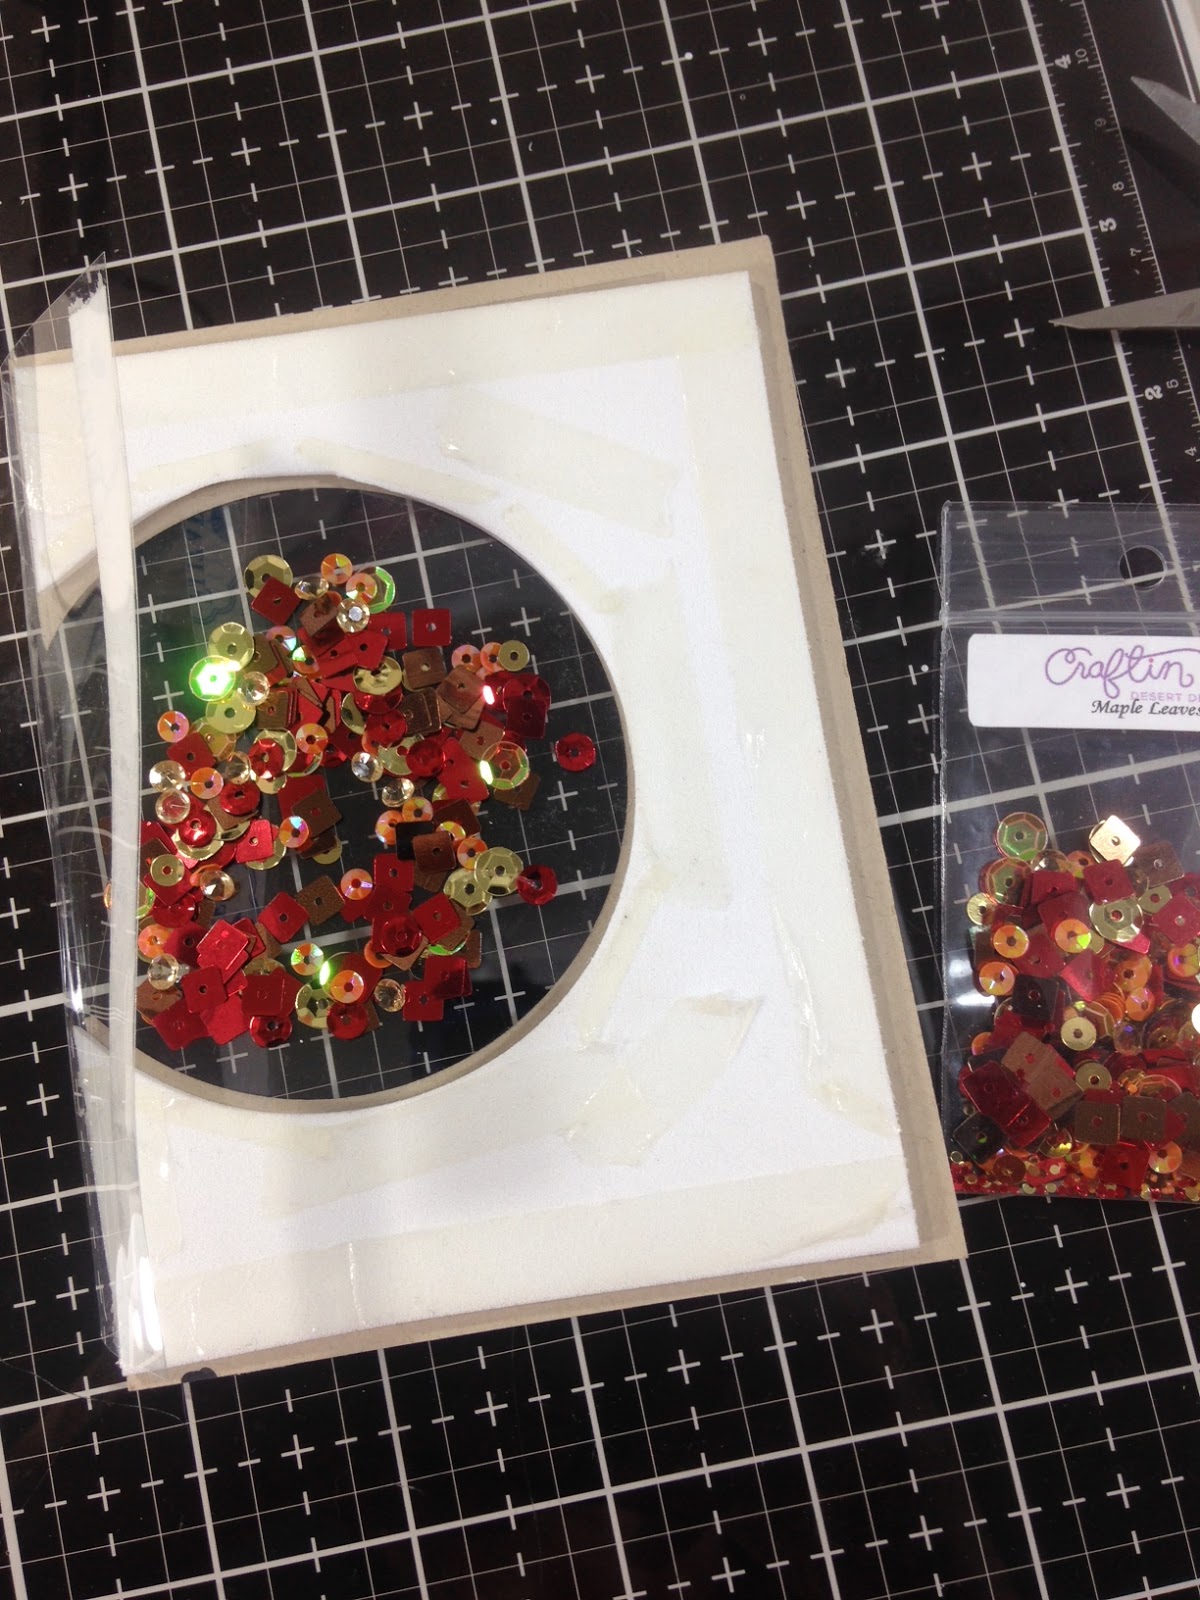
Now it’s time to assemble the card. I cut a piece of fun foam and added adhesive all over both sides. I also added a piece of Scor-Tape to the acetate flap that was created with my scoreboard.

Add your foam tape of fun foam to the backside of the front panel.

STEP 8

Step 8: Add Sequins

Before adhering your back panel to enclose the window you will need to add some sequins. The sequins I used here was from a fall pack that is no longer available but , choose the assortment that best works with your color combo. (A comparable mix is listed in the supply list below, .)

Once your sequins have been added, carefully remove your adhesive backing and add your back panel. Now you can remove the backing from your acetate flap and adhere it to the back side of the back panel.


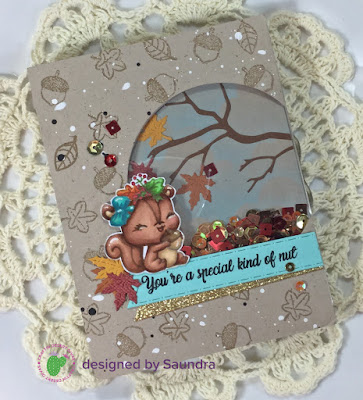
I added my shaker panel to a top folding card and decorated the front with this cute little squirrel and a sentiment from .

I hope you found this tutorial helpful and that you’ll give a shaker card a try very soon!

Friday, August 17, 2018

August Release Blog Hop Day 1 + Product Reveal


Welcome to the first day of our August Release Blog Hop and Product Reveal! 

We're SOOOO excited to kick off the fall season with adorable new characters like trolls and fun fairies plus brand new dies and stencils that provide SO many uses! Just wait until you see them all.

When you shop today through Sunday 8/19, you'll get 5% off your ENTIRE order (including new releases!) when you use the code AUGUST2018

Here's a look at all the new products:


Critter Punnies is a 4x6" clear stamp set that's packed with adorable animals and fabulous coordinating smaller images (like the rabbit and carrot!). Rounding out the set are punny sentiments that coordinate with each image.


Dam Shame is a 4x6" clear stamp featuring a fun, modern-whimsy line style that coordinates with all the other sets in our August release. Dam Shame features busy little beavers with punny sentiments that will be sure to raise a few eyebrows and cause lots of laughs. (One of Tara's absolute FAVORITES! 😻)

Fall Fairies is a 4x6" clear stamp set featuring fairies with sweet details like a floral crown and a petal hat. The sentiments are great for fall and you'll love the woodland friends that coordinate with the fairies. They make such a sweet pair!

Favorite Nut is a 4x6" clear stamp set with a cute name and an even cuter collection of line art images and sentiments. The images in this set are sized generously, which makes coloring SO much fun with more room to add shading and sweet details.


Grateful Trolls is a 4x6" clear stamp set that features your favorite troll characters in a variety of sweet fall scenes. Each stamp is ready to stamp, color, cut and adhere to your card backgrounds. More time coloring and less time masking? Yes, please!


Leafy Background is a 4.5” x 6.5” clear background stamp with a beautiful leaf pattern that can be used year-round! Color it in, heat emboss it, use watercolor over the top - there are SO many options!


Both Hill Scene stencils are fantastic for creating borders, paths, clouds and any background you can dream up! They're so versatile and work beautifully with Distress Oxide inks, too (available in our shop).


The Inside Scalloped Oval Dies are PERFECT for your shaker cards! The double-stitching details are gorgeous and make your cards look polished right out of the die cutter. The borders are nice and thick, making it a go-to for your shaker cards!


The Mushroom Border Die is must-have for anyone's die-cutting toolkit! There are so many little images in one border that can be used together our August stamps. Use them as embellishments on your cards, put them in a shaker, or add them into a background scene.

And did we mention the digis? If you love coloring as much as we do (of course you do!) we have some SUPER cute digital stamps that we released throught this week as well. You'll notice our digital designers using them throughout the hop. Here's a quick peek at all the NEW digis:


Hop with our Design Team today and tomorrow as we showcase the brand new products. 
Let us know in the comments below what your favorite new sets are.

The Full Hop list for Day 1 is below:

Craftin Desert Divas: You're Here

Joy

Take a closer look at our dies and stencils in this video by Elaine:


See you back here tomorrow with more inspiration from our Design Team!

Sunday, August 12, 2018

August Release Kick Off: Favorite Nut

Welcome to Day 1 of our August New Release Week!


We've got a FULL post for you today where we'll be revealing the first of our August Digi Release, Sneak Peeks from Day 1 of our August Product Release plus a new stamp release video!

To kick things off, we'll be showcasing Favorite Nut, one of our newest stamp sets being released on Friday, August 17th.

What we love about this set:

Favorite Nut is a 4x6" clear stamp set with a cute name and an even cuter collection of line art images and sentiments. The images in this set are sized generously, which makes coloring SO much fun with more room to add shading and sweet details.

If you haven't joined our Facebook Event yet, be sure to do that after you've checked out all the beautiful projects our DT is showcasing today. We're unlocking discounts and will be sharing a video demo of the new sets before anyone else sees them on Thursday - just for attendees!! :) 


(be sure to mark "going" so you don't miss a single peek!)

Design Team Inspiration


We are so honored to have Anaa joining us this week as one of our August Guest Designers!


Click here to visit

Click to visit Natalie's Blog

Click to visit

 
Click to visit Ashley's Blog

----

August Release Kickoff Video

with Elaine


We absolutely adore Elaine's card with the scene she created using Favorite Nut.
for more on how she created it!


Click here to view more details on Elaine's Blog
----

Digi Stamp Release


Our newest digital stamp release is SO much fun and could be used to create planner embellishments, tags, cards and more.

We'll be releasing digis throughout the week so check back daily to see what's new. Our digital designers will join us on Friday and Saturday for an all-team 2 Day Blog Hop that you won't want to miss!


----


Stay Inspired


Be sure to follow along with us in our August Release Week Facebook Event for more sneak peeks and inspiration posted throughout the week. See you back here tomorrow when we preview "Grateful Trolls"! 


Older Posts Home