

Hello Divas;
DT Susan here from www.stampbackandrelax.blogspot.com. I am here on the Craftin Desert Divas' blog for the first day of the February release. This release is adorable and features a few sets I am obsessed with - particularly Gnomie! I had a book as a child all about a gnome that looked the main character in this set and I love the house.
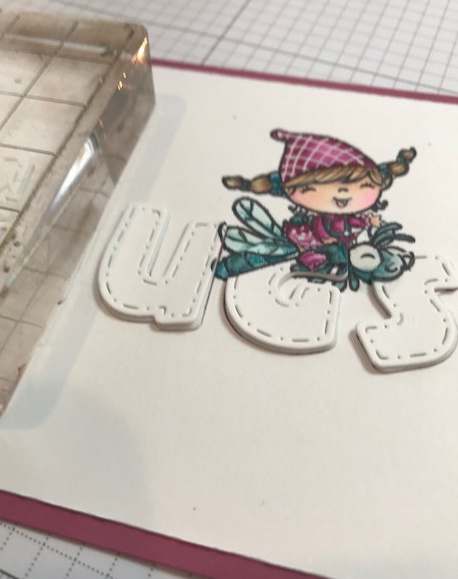
Our new die set of the stitched alphabet and numbers is so cute and so very useful. I have used it four times already. I even made a stencil from the alphabet before I cut it apart. Watch for that card later.
Today I am featuring the flying fairy gnome and the alphabet set. Here is my card:

I have die cut the colored image with the dies and popped them up on craft foam.
Copics Used:Face: E0000, E00, E01, E70, RV10
Hair: E30, E33, E35
Dress: Rv63, Rv65 and RV69 with white gel pen.
Dragonfly and shirt: BG70, BG72 and 75. I added a touch of colored pencil for detail work.
First, I stamped the image and then colored it in. I then lined up the dies using my MISTI as the bottom of the MISTI is magnetic. I did this to keep the letters straight.

Next, I added a piece of painter's tape over the word HUGS to keep the dies altogether in a straight line.

Then, I die cut the letters from my colored image. This will cause some letters to have coloring on them. Then, I die cut the word from fun foam and popped the panel flat onto a card base. I then used a liquid adhesive to glue each piece of fun foam down.

Then, I glued the die cut pieces onto the image and you can see that the colored pieces line up perfectly with the die cuts. This gives the card a bit of dimension. I am going to try this technique next with a floral stamp or a series of our mushrooms from different sets. I think that might be adorable. As you can see, this technique has endless possibilities.
Have fun looking at the new release each day! I cannot wait to see what you make. Don't forget to post your projects in the !

Product used :
Craftin Desert Divas:

|
Cute!!
Reply