Thursday, August 31, 2017

You're Dino-mite!

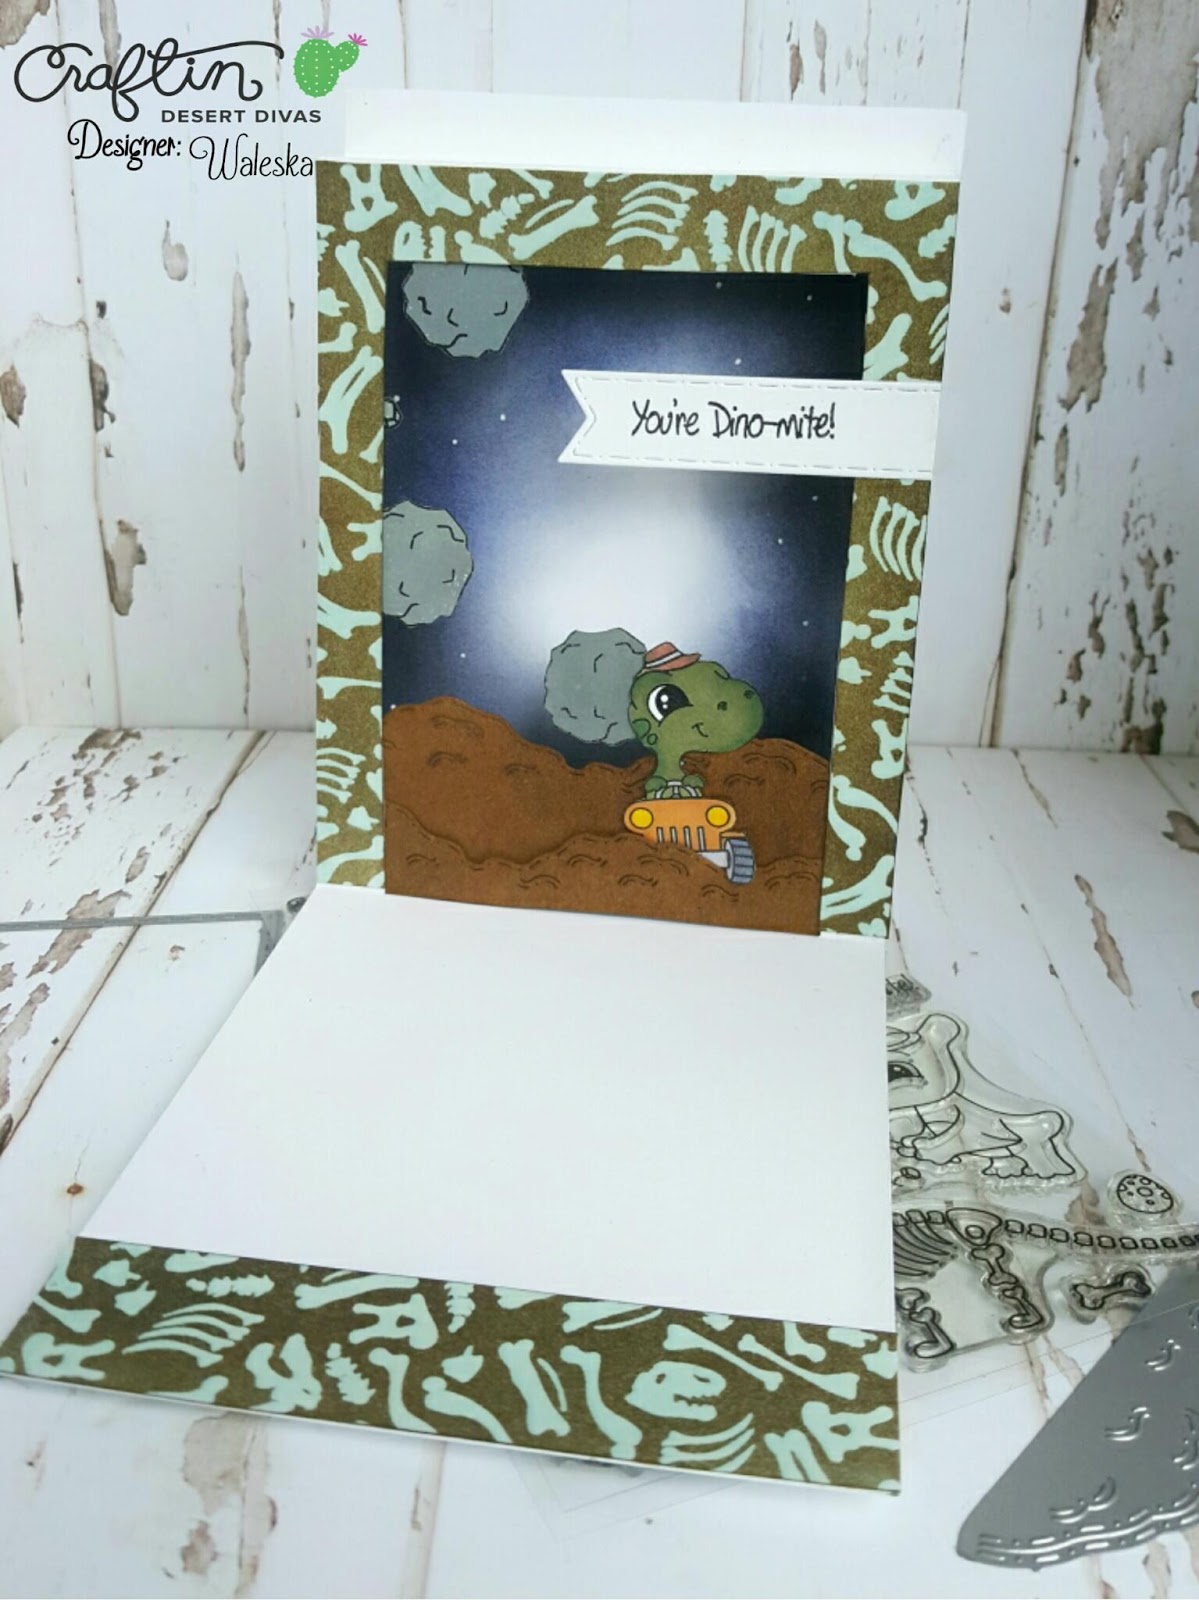
Hello CDD Friends, Waleska from craftinglovew here to share a very fun card with a 3D effect with one of the cute characters from  Dino Dig... I hope you are ready for our all NEW and AMAZING September release that will be coming soon!!! 


CARD DETAILS:

For this card I started with the inside part of the card, for that I cut a piece of  paper 11x4.5 inches, I centered and die cut a square window and make two marks of 1/2 inch in the up part of the square with a scoring board and fold them to create the 3D effect.  I also scored at the bottom of the square to create the folding window.


After that I die cut and glue another window from a Dinosaur pattern paper for more sturdiness to my window.  I planned and color my scene with this cute dino guy running away from the stones.  I die cut two of the garden border dies to create the ground for my image and glue it to the back of my card frame, after that I created the night background with Chipped Sapphire and Black Soot distress inks. 


I glue my 3D Window to a top folded card base in the upper and down part of the card to create the 3D effect and double folded all the creases to make sure my card will pop up when it is open by the recipient.  I finally added the rest of the images and the sentiment with glue.  


I left the outside of the card very simple because of the inside Surprise! I had so much fun creating this 3D card.  I hope you have a great starting Month tomorrow! 

Hugs,


CDD Products used:


Wednesday, August 30, 2017

Malibu Flamingo Planner Pages

Good Morning and welcome friends! This is Nancy with the design team again, here to share with you another layout in my Happy Planner. I'm calling this layout Malibu Flamingo because it is inspired by beach front living. As I have never been to Malibu, but grew up in Florida this is my interpretation based on movies and television.


 For this layout I am using products from the Carftin' Desert Divas August release and some of my favorite digital images. I love how physical stamps and digitals can work together seemlessly.  Digital stamps are also a great way to bulk up your stamp collection. I have probably used the palm tree in this layout a dozen times or more in other layouts.


I started with two of my favorite flamingos from the Tickled Pink stamp set as my focus. I love that they seem to be living it up on vacation somewhere. And of course, tropical birds would take a tropical vacation. The flamingo riding the bike is my favorite image in this set. Along with the rolling skating lady flamingo, they remind me of the opening credits of Three's Company. Now THAT is a memory from a long time ago!!


 If you have seen any of my other layouts or blog posts, you are probably aware that one of my favorite digital stamp sets is the Planner Basics Bundle. I use this set ALL the time. It is exactly what the name implies, basics for your planner. Because of this, you can use the images over and over and over. Today I have used some of the images that I don't use quite as often. I used the banner and the weekend banner image as I felt they helped convey my Malibu theme. I layered the banners with the small flower image from Tickled Pink to create my tropical banners.


 I also used the layered banners at the top of my page as date covers. Sometimes I work ahead in my planner and start layouts on weeks where I didn't intend for them to be. That was the case here. Luckily the banners cover the dates perfectly, and I can use this layout on the dates I had originally planned.


 As I am known to do, I created a bonus project for this layout. You may know that I love shakers (well, and flamingos) so a shaker bookmark was a given.  I created the background using Distress Oxide Inks on regular cardstock and splattering with water. I cut a full sheet of cardstock in half to use one piece for the base of the shaker and the other for the top border. Using the Inside Scalloped Rectangle Dies, I cut two frames from the largest die. I knew I wanted to use this frame for the border on the shaker. But alas, the frames were not as large as my base piece. No problem. I just cut the frames apart and pieced them back together to make a frame that fit.


 I thought it would be funny if a flamingo who wanted to play ball on the beach was suddenly surprised by all the other ball playing flamingos and found herself under a shower of beach balls. So I stamped the beach ball and masked it into the arm of the ice cream eating flamingo. Then I stamped multiple beach balls to float around her. I added some coordinating glitter just for sparkle.


I hope you enjoyed this project. As always, the products used will be listed below. If you have any questions, or want to say hi, comment below or reach out to me on Instagram at Happy Crafting and I will see you soon!!
Products Used:


Tuesday, August 29, 2017

Mission Control, Birthday Wishes Are In Order

Distress Oxides vs Distress Inks Galaxy Background feat Craftin Desert Divas Space Cadets

Hello everyone! It's DT Laura here, from A bit of my crafts, with two cards and a video today showcasing the Space Cadet and the Ahoey Matey digital stamps. 
I knew I wanted to make a galaxy background, and I thought it would be interesting to compare what kind of looks are achieved using Distress Oxides and Distress Inks. So I ended up creating two cards, and you can already see in the pictures how different those backgrounds are! I think they both look beautiful! So let's have a look at how I made these cards!
As a first step I printed my images on some Neenah Solar White cardstock, cut them using my Silhouette Portrait, and I colored them in with my Spectrum Noir markers. I altered the pirate image from the Ahoy Matey digital stamp, and with just a few touches I turned him into a space  pirate! First I drew a helmet for the cat and one for the pirate, and then I colored the ship and the sails using some cool greys to make them look as if they were made out of metal. I also added some line and dot detail to create the appearance of metal parts and bolts on the sails and on the ship body. As a final step I added highlights with my Uniball Signo white gel pen. I wish I had filmed this part too, but I hope you get the general idea - and if you are interested I could always film a separate video for that!
Once the images were colored I moved on to my background. I cut two pieces of Strathmore Bristol Smooth cardstock to 4 1/4" by 5 1/2"; I used this particular cardstock because Distress Inks and Oxides blend really smoothly on it - it makes the job so much easier! For a "fair" comparison I decided to use the same colors for the Oxides and the Inks: I chose Black Sooth, Faded Jeans, Picked Raspberry, Wilted Violet and Peacock Feathers. 
To create the galaxy background I proceded as follows for both card bases: I put down some Picked Raspberry, Wilted Violet and Peacock Feathers in different areas of my base, without being too careful at this stage about getting a nice blend. In this phase I just wanted to block in the areas where these colors will show in my galaxy. I then added Faded Jeans all around the edges and in the areas that were still empty, trying to blend it with the other colors. I then repeated the same step with the Black Sooth, which I also very lightly blended on top of the colorful areas to darken them a little bit. To add the stars I used some white acrylic paint: I diluted it with some water and used first an old toothbrush to create smaller stars, and then a paintbrush to create some larger stars. I also added some stars using the silver color in the Gansai Tambi palette for some subtle shine. 
Once everything was dry, I cut down my backgrounds using the largest die in the Crazy Stitched  Frame Dies set, and I glued them down to some Core'dinations black cardstock cut at a standard A2 size.
I then used my Tonic Studios Guillotine Trimmer to cut one of the two sentiment banners, and for the other I used one of the dies in the Flag Banner set. 
To finish the card I adhered the sentiments and the images in place using Tombow Mono Multi glue and my Tonic Studios Funky Tape Runner. 
And here you can see pictures of the two cards. The one with the Distress Inks:

Distress Inks Galaxy Background feat Craftin Desert Divas Space Cadets

and the one with the Oxide Inks:

Distress Oxides Galaxy Background feat Craftin Desert Divas Space Cadets

Which one is your favorite?
As I mentioned at the beginning of this post, I filmed a video for this card focused on the galaxy backgrounds, that you can watch below


And that's it for today! I really hope you liked these cards and found this comparison between Oxides and Distress Inks useful. You can find the list of the supplies at the end of this post, and I will catch you soon with another fun project! Have a great day, 

List of supplies


Uniball-Signo-White-Gel-Pen

Monday, August 28, 2017

Have A Monster-licious Birthday!

Hello Everyone!! It's Lindsay from the DT here with you today, sharing a fun boy birthday card using the Monster Carnival Stamp Set and a few different die sets! I say this is a boy birthday card, because that's what I went with in my color scheme, however, you could easily switch up the colors to make it completely customizable to the recipient! Be sure and watch the video tutorial below to see how I put the entire card together!!
ENJOY!!


I always like to start with all of my die cutting, so with the largest rectangle from the Inside Scalloped Rectangle Dies, I cut the frame from white card stock. I also used the Box Die and cut that from a patterned paper and also a dark blue card stock that matched the patterned paper. Finally, I used the Mini Banner Die and cut that from some orange, blue and green card stock scraps. For my stamping, I used the Monster Carnival stamp set and Memento Tuxedo Black Ink so I could then color in the little guy with some alcohol markers. After the coloring was done, I did fussy cut, but remember, Craftin Desert Divas does offer SVG files for only $0.99 for all of their stamp sets!!! (I REALLY need to get an electronic cutter!!)

Moving onto the background of my card, I used my watercolor pallette to create a quick splatter on my A2 top folding card base. I did mask off all the edges of my card base to keep them nice and clean. While I was waiting on my splatter to dry, I moved onto assembling my box. First, I simply adhered both the patterned paper and plain card stock box together to create a double sided paper. Next, I folded up the box and didn't use the tabs, but instead, cut them off so the box laid nice and flat. Finally, I inserted my little monster so it looked like he was jumping out of the box!!

To put this card together was so incredibly simple, I adhered the rectangle frame with fun foame and double sided adhesive. Next up, I put the banner that I created (watch the video for all the details on how simple it is to create this!) in the top left hand corner. Finally, came my little monster in his box in the bottom right hand corner. For my sentiment I simply stamped "Have a Monster-licious Birthday" from the Monster Carnivals stamp set in black dye ink!


I have been waiting to use these little Monsters again since they were first released! They are absolutely adorable and make some really cute cards, whether it's for a boy or girl!!! I hope you all enjoyed today's video tutorial and if you are interested in any of the Craftin Desert Divas products I used on my card today, you will find them all linked below! Happy Crafting!!

Sunday, August 27, 2017

Have A Fantastic Birthday!

Hello everyone! DT Ale here today sharing a fun way to you your stamps and dies! When I was little I was always fascinated by pop up books, I though they were magical . So what I am sharing today is an easy way to create your own pop up book using stamps and dies.
To start my card I stamped and colored all the images I used and then die cut all the elements I needed for my scene!
I wanted to have a summer themed card so I used stamp set ,  , and 
For the die cuts I used  and 
Now to create the actual pop up book I started by inking the inside of a kraft card base using Distress ink to create the idea of sand , the I adhered the borders that I already die cut .
Next I added the images using glue dots and also adhered the clouds and the sun using acetate to make them look like they are in the sky . And so my pop up book was done.
This was just a page on my book, I will sure make some more .
Thank you so much for stopping by! Have a lovely day!
Supplies 
Newer Posts Older Posts Home